The bigger your email list, the more money you will make. Therefore, the more you to do grow your list, the more your revenue grows.
I mean, it is almost a natural law when it comes to online business.
So, anything you can do to grow your list faster is going to be a very high leverage thing to do. Much more useful than scrolling through other people’s photos on Facebook. 😉
The good news is that most of us are sitting right on top of numerous opportunities to grow our opt-in rates. We just don’t see them because we’re too busy… not thinking about it. Growing your list faster doesn’t take “ninja tactics” or any secrets of the gurus. Really, all it requires is deciding to spend time on doing whatever everybody KNOWS works… but usually don’t do.
The good news, too, is that these strategies don’t take very long at all. If you cut out the distractions (in other words, close Facebook) and just focus, you can execute one of these strategies in an hour or two.
If you do this regularly, your list will grow faster.
So, let’s get started….
1. Create A New Lead Magnet
“Subscribe to our Newsletter” is quite possibly the dumbest call to action ever to litter the internet. It might have worked back in the 90’s when “You got Mail!” made people feel special. But, today? Ha!
Today, you need to give people a damn compelling REASON to subscribe to your email list. And that reason is simply an opt-in offer, otherwise known as a lead magnet. Even if the goal is to send them a weekly newsletter, you are almost always going to need to give them a lead magnet to get them in in the first place.
Now, for most of you, I would imagine the concept of a lead magnet is nothing new. However, ask yourself this…
Do you have only one or two lead magnets?
If so, then time to get busy. Because…
The more lead magnets you have, the easier it is to grow your list.
Not everybody who comes to your blog will be interested in the same things. Not all people think the same. So, you ideally want to have a library of lead magnets available. Every time you publish a piece of content on your blog, you pull out the most relevant lead magnet and attach that to the blog post as the call to action.
Now, this could seem like a lot of work. But, there’s good news…
In my experience, it is usually the shortest, most direct lead magnets which convert best.
We’re talking checklists, resource lists, very short tutorials perhaps. And these things convert far better than some 50-page ebook they’ll never read anyway.
Here’s some ideas:
- Create a page on your site with a list of resources or reviews to apply something covered in a blog post.
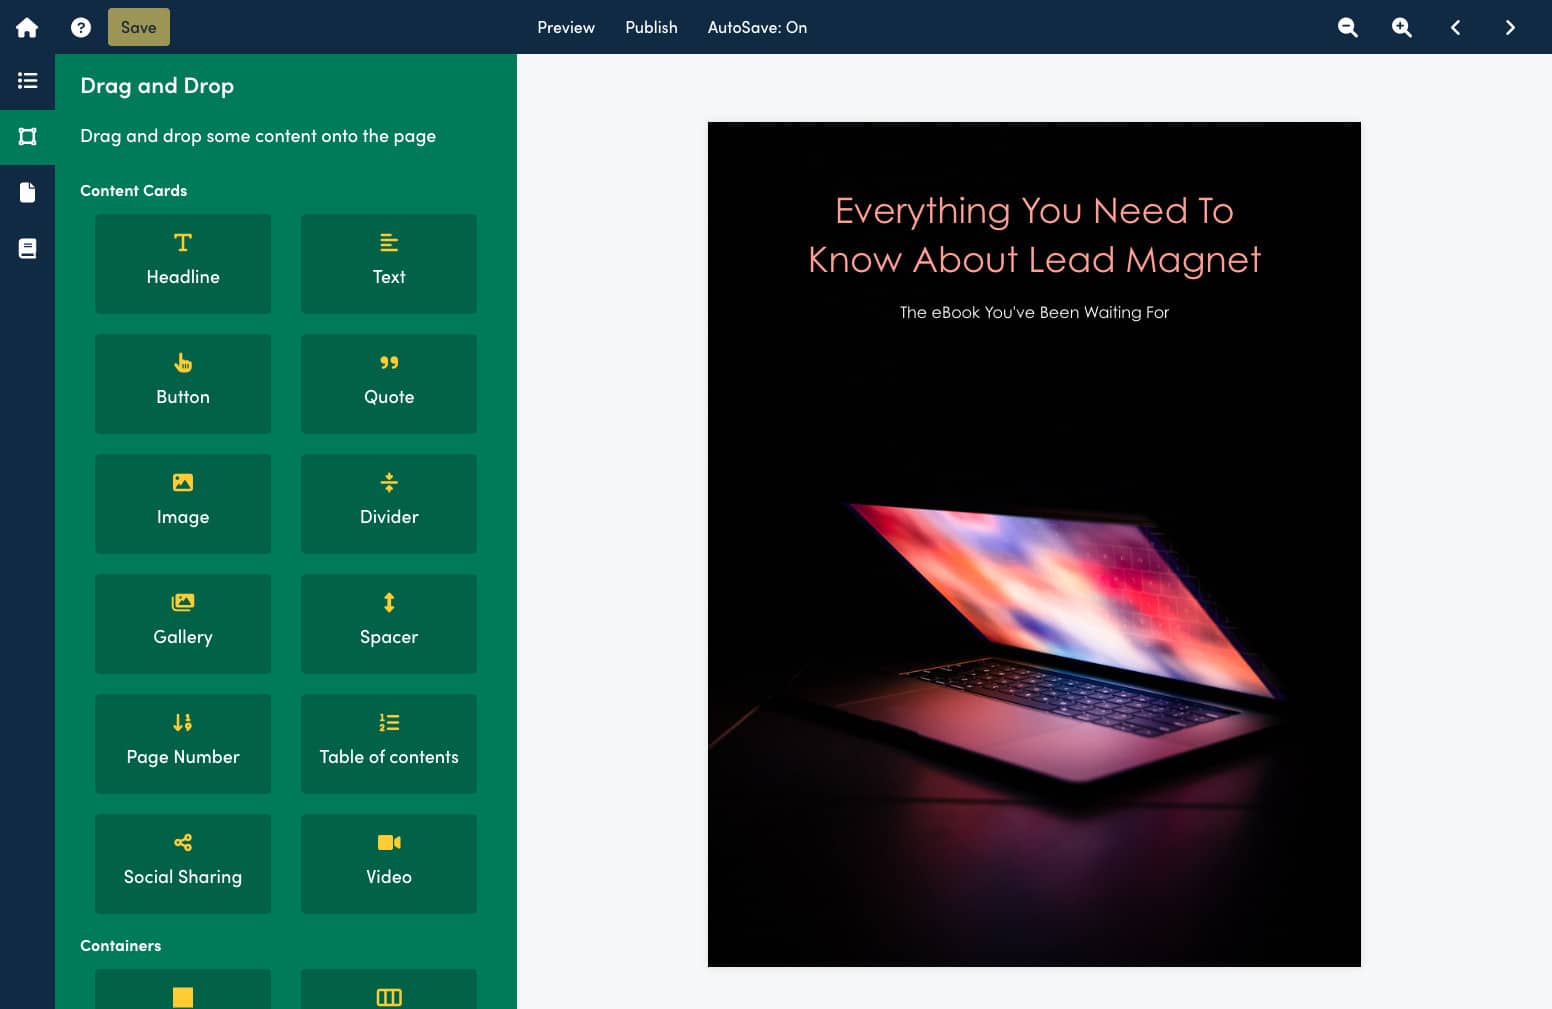
- Take one of your top-performing posts and use a service like Beacon to easily turn it into a well-formatted downloadable PDF.
- Create a checklist or worksheet to go along with a blog post.
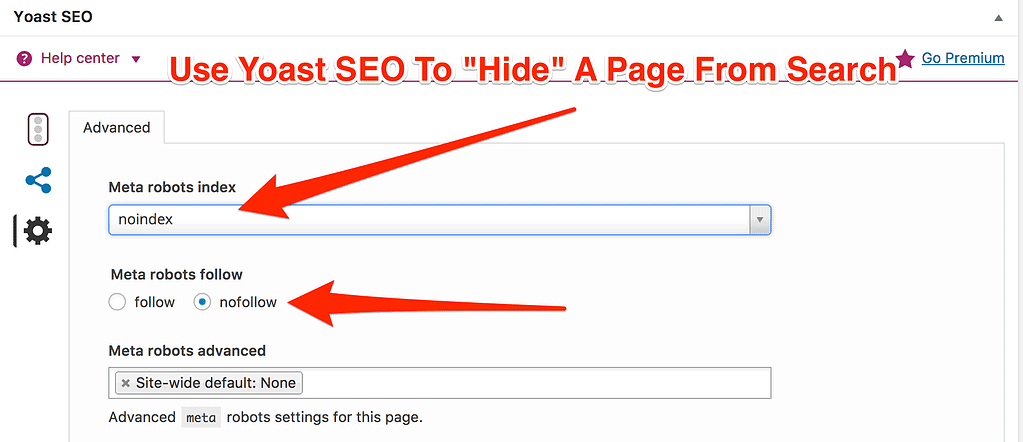
PDF’s are not the only way to go. If it is easier for you, just create your lead magnet on a PAGE on your site. Be sure to hide it in the site navigation. Also, use your SEO plug-in (such as Yoast SEO) to set the index settings to “no index” and “nofollow” so that this private page will not be indexed by search engines.
2. Create A Content Upgrade For A Popular Post
A content upgrade is simply a lead magnet which is highly specific to a single blog post. It could be a specific bonus for readers of that post, a tool to help apply the post, a checklist, etc. If the content upgrade is on a podcast episode or a video, it could be as simple as a PDF transcript so they can reference it later.
I encourage you to keep it simple. You don’t need to spend hours on creating a content upgrade.
It starts with looking at your site stats and seeing what your most popular blog posts are. This way you are spending your time on the posts with the most visibility. Come up with some content upgrade ideas for your top posts.
Get a big jumpstart on thinking up lead magnets that convert like crazy.
Most blogs have a conversion rate to email of maybe 1%. By having strong lead magnets – in the right locations – you can bump that up to 5-6% or higher. I’ve gotten double-digit conversion rates on blog posts… and 50+% conversion rates on squeeze pages. It all starts with the lead magnet.
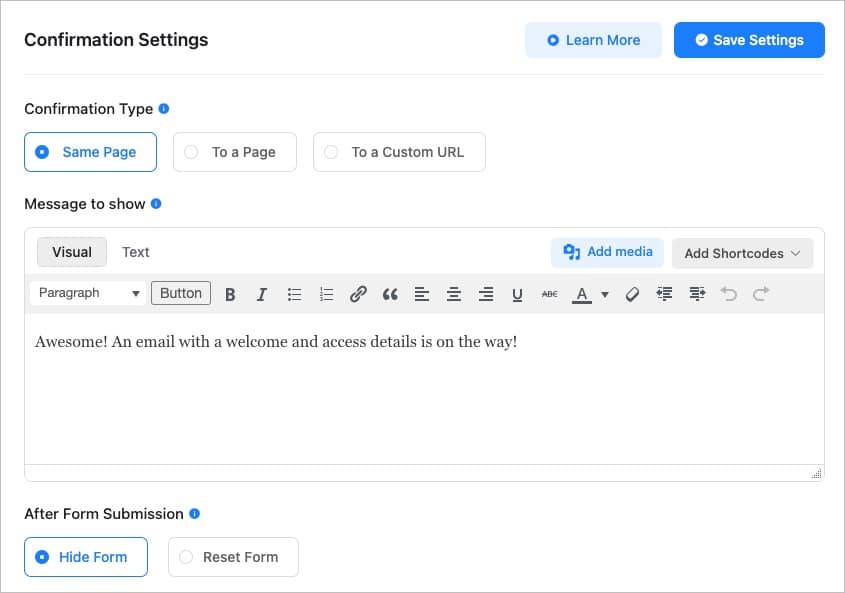
When you create your opt-in form for the lead magnet, I would recommend setting it up in a way which will not interrupt the user experience. Most opt-in forms will take them AWAY from your blog post when they opt-in. Instead, I recommend setting it up where they will not be removed from your post. Just add them to the list and confirm that they can check their email later to get their download.
How you set this up will depend on the tool you’re using to build your opt-in forms. Personally, I am using Fluent Forms much of the time. Fluent Forms can do so much more than opt-in forms, but it can most definitely handle your lead magnet opt-ins as well. For inline opt-ins where I don’t want to remove them from the page, you could just use a “Same Page” confirmation type and type a message which makes sense.
Further Reading: Subscriber-Only Content: How To Ensure Only Your Subscribers Can Get Your Lead Magnets
3. Start A Split-Test On One Of Your Top Opt-Ins
A split test is when you run 2 or more versions of the same thing in order to see which one converts the best. The software will automatically rotate the different versions and track the conversion rate and then you can see which version works the best.
By doing regular split testing, you can optimize your conversion rates over time. But, admit it…
You’re probably not doing split testing on your opt-in forms on a regular basis. If at all. And don’t worry… you’re not alone. 🙂 But, we should all strive to be better, right? 😉
First off, you need to be using software that is capable of doing split testing. If you’re using an opt-in tool which is purpose built for that, it may support split testing. Something like Thrive Leads or OptinMonster can do it. If you’re using ConvertBox, it can certainly do it.
Related Reading: ConvertBox Review: 15 Pro Strategies Using ConvertBox To Grow Your Business And Make More Money
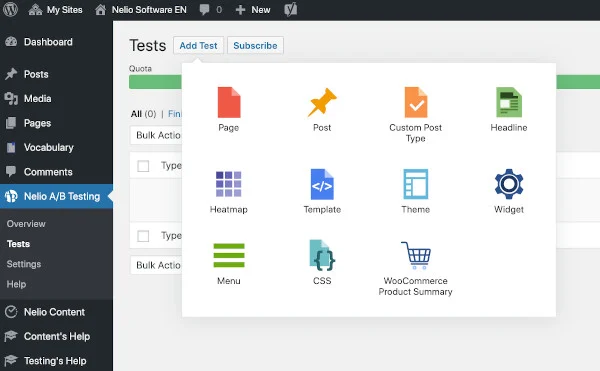
If you want to run split testing within WordPress, you can check out Nelio Testing. This is a paid service, but integrates right into WordPress so that you can run your tests natively. This would allow you to test things regardless of your opt-in tool.
Keep in mind, split testing is a long term plan. And it can take even longer if your site doesn’t get a lot of traffic. So, this is definitely an 80/20 thing. You can end up spending more time on this than the results will warrant. In the right situation, though, this can be a quick action you can do to help increase opt-in rates over time.
4. Put An Opt-In On Your Videos
Videos can impart your message better than almost anything else. They’re a fantastic form of content marketing and you really should be using them.
You can also put opt-ins within your videos. Some ways include:
- If making a Youtube video, be sure to provide them a call to action to go to some page on your site to opt-in. Point them to a landing page.
- Perhaps record a “commercial” which you can use across multiple videos. Just a short call to action clip maybe 20-30 seconds long that invites them to optin. Then, when editing your video, be sure to include the clip at the end.
- Perhaps put an opt-in overlay right over top the video so they need to opt-in to watch it.
This is one advantage to using Presto Player for your videos on your website. Presto Player enables you to put email capture forms on your videos… even if it is a Youtube video.
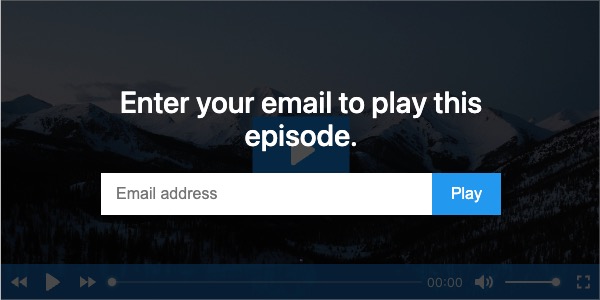
Currently, Presto Player works with ActiveCampaign, FluentCRM, Mailchimp and MailerLite. It also has support for webhooks which would allow it to technically integrate with almost anything (but it is a little more nerdy). Personally, I use and love FluentCRM and the integration is easy to set up. You set up a video preset and enable Email Capture. Here’s how to set up Presto Player to add people to your FluentCRM list.
BTW, since Presto Player works with Youtube videos, too, you can even put opt-ins over top videos you embed on your site that other people recorded. Just use Presto Player and use the video preset you created to use your opt-in form.
Related Reading: Presto Player Review: Could This Be The Video Player You Always Wanted For Sales Videos And Online Courses?
5. Experiment With Placement Of The Opt-In Form
We’ve already talked about running split tests on your opt-in forms. But, one of the things you definitely should be testing is placement of your opt-in forms.
Most blogs have a primary lead magnet placed right in their sidebar. However, the sidebar is usually one of the worse performing locations for your opt-in. The header and post footer typically perform better. But, better yet…
Opt-in forms right in the middle of the content itself is what usually converts the best. It makes perfect sense, too. They are there for the content. That’s where they’re looking. Not your sidebar.
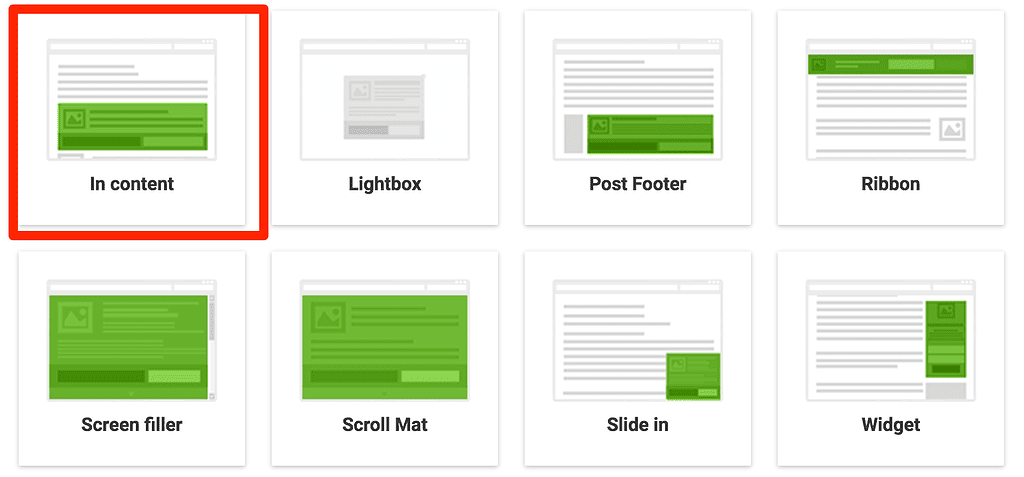
It is definitely work experimenting with different placements. In-content forms will almost always convert the best. Sidebar placement (if you have a sidebar) can make sense if done right. Popups can convert, but most people just end up annoyed by them so you need to use your own judgement on that. Personally, I intentionally don’t use popups because I don’t want to treat my visitors in a way which I wouldn’t appreciate myself.
How you achieve certain placements on your site will depend on the software you use. Some dedicated opt-in tools have built-in placement options (such as those pictured above). Personally, my site is built with Kadence Theme. So, I use Kadence Elements in some spots to put opt-ins into certain spots across my site. I also built calls to action in the block builder and turn them into repeatable blocks so that I can edit them centrally on my site. The Reusable Blocks Extended plugin is certainly useful for that.
6. Optimize Opt-In Forms For Mobile
Mobile traffic is a really big deal these days. So many people are browsing our sites on mobile devices so it is VERY important that your site is mobile responsive to work on smaller screens.
But, your opt-in forms are no different. Opt-in forms which may appear just fine on a desktop can be all but invisible or just plain annoying on a phone. For instance…
- A sidebar opt-in will usually be pushed way to the bottom of the screen on a mobile device, since sidebars usually just get kicked to the bottom. Your opt-in rate will be garbage.
- If you use an exit pop or some other popup, the trigger settings might not work right on mobile. Plus, there’s little that’s more annoying than having an opt-in completely takeover my iPhone screen when I’m on a site. It is interruption marketing at it’s finest.
- Sometimes, the design of an opt-in form just looks plain stupid when it is stuffed onto a smaller mobile screen.
It is definitely important that you check your opt-in forms on mobile devices. If necessary, adjust the design to accommodate the smaller screen. And if needed, just disable it for mobile altogether.
One way to check things on mobile is just to use your own phone. But, an even easier way I often use is to use the Inspector built into my web browser. If you’re on a Chrome-based browser or Firefox, you can right-click on your website and choose “Inspect”. Then, look for the little mobile icon at the top of the inspector.
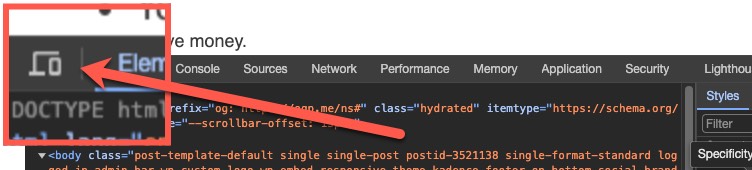
You will then be able to view your site right in your browser as if it were a mobile device. And you can change the device settings to view it on different size screens. It is quite a handy tool and I use it often.
7. Create A New Landing Page For A Lead Magnet
If you’re running a content upgrade, then it is usually only going to be available on the blog post it was created for. But, if it is converting well, perhaps it can stand alone.
Creating a single-purpose landing page for a lead magnet allows you to promote it in a number of new ways, including the potential for paid advertising.
Essentially, a landing page is like a homepage for your lead magnet. It means you won’t have any of the usual distractions like header navigation, blog posts, or anything else. The page is purpose-built solely for the purpose of getting the opt-in.
How you want to set up and organize your landing pages is up to you. One method is to create a page on your site called “Landing Pages” and then simply choose that as the “Parent” for all your landing pages. This will have the effect of having all your landing pages as sub-pages of one and that makes organization easier. Another option is to create a custom post type for your landing pages.
Use your favorite page builder to build your landing pages. Personally, I just build my pages with Kadence Blocks and it works wonderfully. You can also use a full builder like Elementor if that’s easier for you.
If the lead magnet doesn’t have a landing page, then simply create one. If it does, then create a new version and run a split test.
Then, you can set up some ways to use that landing page in your promotions, such as:
- Send existing subscribers to that landing page who haven’t already opted in for that lead magnet (you should be able to segment based on that information). This is a good way to re-activate people or get them into a sales funnel.
- Set up a simple retargeting campaign that runs an ad to visitors of certain posts but have not opted in. Have the ad send them direct to the landing page for the lead magnet which is most relevant to the post they came to your site for. You can get opt-ins from people who already bounced off your site this way.
- Set up a cold traffic campaign to earn NEW leads and send them direct to this lead magnet.
- Put social media updates that point direct to this landing page and put it into your regular rotation of maintenance marketing across social.
Landing pages are a key tool to grow your list. You shouldn’t depend solely on your blog to do all the heavy lifting.
Schedule Time To Grow Your List Every Week
These strategies work to grow your list. They’re not rocket science. But, many people simply don’t do them despite having read about it a number of times.
So, you need to schedule time to work on this. You should be spending regular, scheduled time every week to executing the strategies in this post in order to improve your opt-in rate.
It is a long term, non-ending project. A quest of constant improvement and you are never done.
Don’t let it consume too much of your time. You have other things to do, too. But, we also cannot forget the importance of list building so it is something you should put some time and attention on.
If all you’ve done is created one lead magnet, posted it and thought your job was done…. NO. Your job just began. Your email list building is suffering greatly if you just throw something out there and hope.
Get a big jumpstart on thinking up lead magnets that convert like crazy.
Most blogs have a conversion rate to email of maybe 1%. By having strong lead magnets – in the right locations – you can bump that up to 5-6% or higher. I’ve gotten double-digit conversion rates on blog posts… and 50+% conversion rates on squeeze pages. It all starts with the lead magnet.
Got A Question? Need Some Assistance?
Have a question about this article? Need some help with this topic (or anything else)? Send it in and I’ll get back to you personally. If you’re OK with it, I might even use it as the basis of future content so I can make this site most useful.