For my membership site), I have optional services that members can purchase. That includes technical services as well as coaching calls.
For both, I take a flexible credit-based approach. Members can purchase one or more service credits. Those credits stay on the account. They can use those credits whenever they wish. And we now even have a debit log so they can see how those credits were spent.
I’ve had many people actually pay me to build a similar system on their membership site. But, in this post, I’m simply going to show you how it is done.
Truthfully, this isn’t complicated. It is all done using “out of the box” tools and some simple automations.
Below, I’m going to show you how my system is built. Keep in mind, you still need some level of understanding of marketing automation tools to implement it. If you would like my help building this in your business, you can look into having me just build it for you.
So, let’s dive in…
In This Post…
Tools I Use In This Setup
This system has evolved along with my membership site. When I first built it, I was using Thrivecart as my shopping cart (read my Thrivecart review here) and Drip as my CRM.
Now, I am using WooCommerce and FluentCRM.
So, in the most recent build of this system, the tools in use are:
I’ll show you how these tools are used below.
Now, to be clear, you don’t necessarily need to use these same tools. WP Fusion is quite important in this setup. But, you could just as easily use any CRM that enables rules and automations. You could use another shopping cart. And there are other ways to create custom fields.
Custom Fields For The Service Credit System
First up, I use Advanced Custom Fields to create the necessary custom fields.

I created a field group called “Member Service Credits”. In that field group, I created the following custom fields:
- Credit Balance. Text field to hold their balance of service credits.
- Credit History. A repeater field, within which I have a field for date, amount debited, and a description.
A repeater field is quite handy in that you can have rows of fields which… repeat. I use this to create a running log of debits from their account balance so they can see where credits were spent. Keep in mind that you’ll need the PRO version of ACF to make use of a repeater field.
This field group is set up to show on the User screen and only for Administrators.
Inside the repeater field, I have 4 fields:
- Date. Uses the date picker field type from ACF.
- Type. Uses the button group field type so I can specify whether the credit was used for a call or tech service.
- Debit. The amount of credits debited.
- Service Description.

Now, when I enter one of the user profiles in Wordpress, these fields look like this:

Using repeater fields for the debit logs just makes it simple. I probably could have gotten fancier with the tech setup of that, but since all I need is a simple display of debits on the front-end, a repeater field works just fine.
Syncing To My FluentCRM
To make these fields usable within emails to members as well as to trigger automations, I need to synchronize with my CRM.
This is where WP Fusion comes in. 🙂
I don’t need to sync the debit log to Drip. But, I do want to sync the balance. So, the first step is to create the necessary custom field in FluentCRM.

I created a numeric custom field in FluentCRM. The reason I chose a numeric field is so that I could use FluentCRM’s built-in ability to increment or decrement the field when people purchase credits. I’ll show you that in a second. 🙂
Now, with that field created, you re-sync the fields with WP Fusion so it shows up inside of Wordpress.

Then, go to the contact Fields screen and match up the credit balance field from Advanced Custom Fields to the field in the CRM. Like so…

Once that is saved, then there’s a full two-way integration between Wordpress and FluentCRM for those fields. This means:
- If I update the field from the Wordpress user profile, it will update inside of FluentCRM. And…
- If I update the field from in their FluentCRM profile, it will update in their Wordpress user profile, too.
OK, next up…
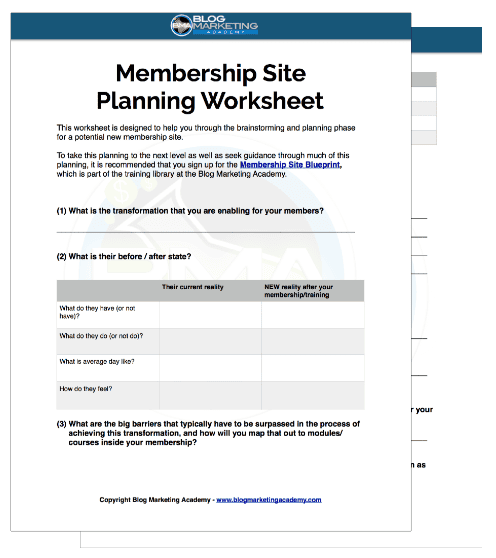
Grab your copy of the Membership Site Planner?
Download this worksheet to guide you through the idea and planning phase of your new membership site – setting you up for maximum signups and income.
Selling Credits And Updating Balances
I use WooCommerce for my shopping cart. I also currently sell credits either as a single credit, 3 credit package, or 5 credit package.
Now, one of the beauties of using FluentCRM is the built-in strong integration with other major tools on Wordpress. And FluentCRM integrates with WooCommerce nicely as you can see.

In my case, I am using WP Fusion’s integration with WooCommerce rather than FluentCRM. There’s no particular reason for that as either method works. The idea is simply to add a tag to their profile when they purchase that product. Here’s how it is set using WP Fusion.

I have a series of action tags I use to trigger automations. As you can see above, when somebody buys the 5-credit package, it will add the tag ACTION: Add 5 Credits.
Now if we pop over to FluentCRM and look at that automation which is triggered when that tag is added:

The automation is triggered when that tag is added, then it performs the following steps:
- Adds 5 credits to their credit balance. (see below)
- Sends them an email letting them know the credits have been added and shows them their new balance.
- Waits 5 minutes. The reason for this is because I have another automation that will send them another email when the field is updated. I don’t want to trigger it twice or cause a loop. By waiting 5 minutes, it avoids that.
- Remove the action tag so it won’t clutter their profile.
- Be done with it. 🙂
The step for adding credits uses FluentCRM’s built-in ability to add or substract from a numeric field. Like so:

You can replace a value, add to it, or subtract from it. In my case, I am adding 5 to whatever the existing credit balance is.
Keep in mind, WP Fusion automatically syncs this field back to Wordpress. So, I only need to update it inside of FluentCRM and their user profile takes care of itself.
Enabling Members To Use Their Credits
OK, at this point, you have credit balances on member profiles and you have a way to sell those credits. Now, let’s look at the delivery side of things.
At the core level, we’re just setting up the systems for the member to submit a request for service as long as they have a positive credit balance. If they have no balance or it is a zero balance, then we present them a message telling them they need credits to proceed.
Let’s look at my service request page first. When there is at least one credit on the account, it looks like this:

And when there is no balance, the form will be hidden and it will say this instead:

Conditional Content In The Block Editor Based On Their Credit Balance
Showing conditional content like this is easy with the Block Visibility plugin. The free version of Block Visibility has an integration with Advanced Custom Fields and that’s what I use to show the correct content on screen depending on the user’s credit balance.
I use an entire row or section (in the block editor) to contain the elements I want to show for people with a balance, including the actual service request form that I built with Fluent Forms. Here are the conditions I place into Block Visibility for that:

A few notes on accessing those settings:
- You must have the ACF integration enabled in the settings for Block Visibility.
- In the block settings panel in the editor, you will need to make the ACF integration visible in the controls.
- The plugin doesn’t have the ability to do “greater than” comparisons, so instead I had to define any value that is not equal to zero. It is a little bit roundabout, but it works.
For the flip side of showing content if they have no balance, I just reverse the settings. On another row which contains the message, I use these settings:
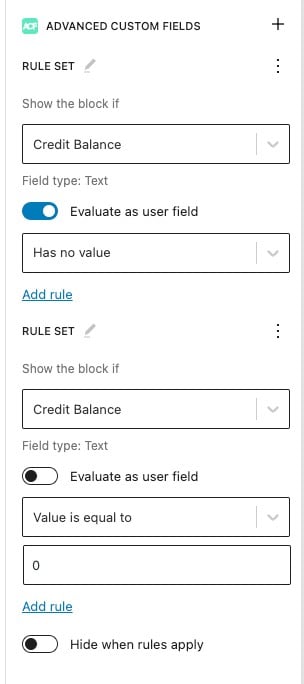
I am showing that row either when there is no value in the credit balance or that number is specifically equal to 0. In order to put in “OR” conditions with the Block Visibility plugin, you need to create another rule set. Each rule is only capable of “AND” conditions, so you need a second rule yet to do an “OR” condition.
That’s how I do this now that I have fully converted this site to the block editor using Kadence Theme. In the previous version of this site, I built the service request page with Elementor. There the process is different, so let me show you how I did it…
Conditional Content In Elementor Based On Their Credit Balance
First, I did create a bit of custom code to enable my own shortcode. That shortcode is “servicecredits” and it’s purpose is to show or hide things based on their credit balance.
Here’s the actual code for that shortcode:
function bma_servicecredits( $atts, $content = null, $tag = '' ) {
	global $current_user;
	$atts = array_change_key_case((array)$atts, CASE_LOWER);
	$wporg_atts = shortcode_atts([
                                     'status' => 0,
                                 ], $atts, $tag);
	$status = intval($wporg_atts['status']);

	// member has at least 1 call credit
	if (!intval(get_field( "credit_balance","user_".$current_user->ID )) and !$status) {
		$content = do_shortcode($content);
		return $content;
	}
	if (intval(get_field( "credit_balance","user_".$current_user->ID )) and $status) {
		$content = do_shortcode($content);
		return $content;
	}
    return false;

}
add_shortcode('servicecredits', 'bma_servicecredits');
The easiest option is to drop that code into the Code Snippets plugin, however you could also put it into your functions.php file of your child theme if you wish.
Now, Elementor is pretty extendible. As you can see in the image above, one way I have used this shortcode is to just surround content by that shortcode. So, will show stuff if they have a positive balance.
Elementor also has an add-on plugin called Dynamic Conditions. This plugin allows a number of options for showing or hiding Elementor content based on certain conditions. It also has the ability to tap into a shortcode, like so:
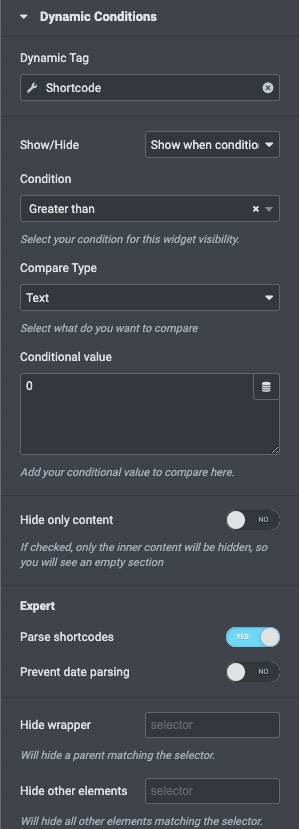
So, using Dynamic Conditions, I can show/hide entire sections of the screen by tapping into my own shortcode.
Also cool is that Elementor and WP Fusion work together beautifully. So, using a similar setup, you can see how I can show/hide entire elements fo the page based on FluentCRM tags:

Using those options, I set up the services screens to react according to whether the person is logged in or not… and whether they have a credit balance or not.
I also require a positive credit balance for people to be able to access my scheduler and book a call with me. I use the exact same methods above to conditionally show my calendar if they have a positive balance. I use Simply Schedule Appointments as my appointment booking calendar.
Making Debits Off Their Account When Services Are Delivered
There is no automatic deduction done from their balance. All credit debits are done manually as services are delivered.
I could have automated it, but I preferred to have direct, manual control over debits so there is no room for a screw-up.
After services have been delivered, I open up their user profile. I add an entry to their debit log (which uses that repeater field from ACF) and I manually alter their credit balance to subtract however many credits I am debiting.
Once I save their profile, WP Fusion takes care of syncing that back to FluentCRM. That also triggers the automation to notify them of their new balance (see below).
Displaying A Debit Of Credit Debits
As discussed above, the other custom field used as part of the service credit system is the debit log. It is a repeater field that consists of 4 sub-fields. So, the other important matter is to SHOW that log on the front-end of the site so that members can see what their credits were used for.
Currently, the log is shown in two places:
- On a dedicated service history screen accessible from the Services section.
- From the member account screen, by setting up a new WooCommerce endpoint.

To display the log, I once again created a custom shortcode. And all that shortcode does is accesses the repeater field and then loops through each entry. The code below is pretty down-and-dirty ad creates the “credithistory” shortcode I can use where I want:
function bma_credithistory( $atts, $content = null ) {
	global $current_user;
	ob_start();
	if( have_rows('credit_history', 'user_'.$current_user->ID) ):

		echo "<table>
		<tr>
		<th style='width:15%;'>DATE</th>
		<th style='width:15%;'>TYPE</th>
		<th>DEBIT</th>
		<th>SUMMARY</th>
		</tr>";
		while ( have_rows('credit_history', 'user_'.$current_user->ID) ) : the_row(); ?>
			<tr>
			<td><?php the_sub_field('date'); ?></td>
			<td><?php the_sub_field('type'); ?></td>
			<td><?php the_sub_field('debit'); ?></td>
			<td><em><?php the_sub_field('service_description'); ?></em></td>
			</tr>
		<?php
		endwhile;
		echo "</table>";
	else :

		echo "<h3><em>There are not yet any records in your service history.</em></h3>";

	endif;

	$output = ob_get_contents();
	ob_end_clean();
	return $output;
}
add_shortcode('credithistory', 'bma_credithistory');
Again, you can drop that code into Code Snippets. To modify the look and feel of the table, you’d need to just edit the code and CSS for it.
There may indeed be other ways of doing this. Any plugin that would enable display of a repeater field on the front-end show be able to show a similar table.
So, at this point, we’re able to sell credits via the shopping cart, add to their balances, and then display their balance to them on the site and give members the ability to submit requests.
Grab your copy of the Membership Site Planner?
Download this worksheet to guide you through the idea and planning phase of your new membership site – setting you up for maximum signups and income.
Sending Customers Notice Of Updated Balances
As stated above, this system has no automatic credit debits. Instead of trying to automate debits, I decided to keep personal control of that. So, all credit debits are done manually via the member’s account. After we do a strategy session, for example, I go and take a credit off their balance and then add an entry to the log.
One thing I thought was important was that my system automatically email an update to the member when their credit balance has been updated.
First, here’s an automation I have set up in FluentCRM to send them an update:

So, let’s walk through what this is doing…
- The automation is triggered when the Send Credit Balance Update tag is added to their profile. I had to use a tag trigger here because FluentCRM does not currently have a trigger based on a field being updated.
- We then do a conditional test to see if one of the 3 purchase tags are on their profile. Remember, those are added from WooCommerce when they purchase. And we wait 5 minutes to remove the purchase tag. This is why. 🙂 In this automation, if any of those purchase tags are present, we end the automation immediately since it would make no sense to send them a balance update email if we just sent them an acknowledgment of purchase via another automation.
- Wait another minute. Just for good measure. 😉
- Next, a new conditional to see if their credit balance is zero.
- If their balance is zero, send them an email letting them know they might want to buy some more credits.
- If their balance is not zero, send them a differently phrased email letting them know their current balance.
- End off by removing the Send Credit Balance Update tag. This way it can be triggered again later.
OK, the last little matter is to actually add the Send Credit Balance Update tag to their profile if the balance is updated. As I said, FluentCRM doesn’t have a trigger based on merely updating a field. Perhaps they’ll add it later. In the meantime, I can accomplish it using a bit of custom code:
function bma_trigger_credit_update( $meta_id, $object_id, $meta_key, $meta_value ) {
    if ($meta_key=="credit_balance") {
    	$tagapplied = wp_fusion()->user->apply_tags( array(23), $object_id ); // 23 is ID of the "Send Credit Balance Update" tag in FluentCRM
    } else {
    	return false;
    }
};
add_action( "updated_user_meta", 'bma_trigger_credit_update', 10, 4 );
This code was dropped into Code Snippets. And it makes use of WP Fusion’s built-in PHP functions that allow you to take coded control of things such as their CRM tags. Quite handy. 🙂
So, this code will add tag #23 (which happens to be the ID of the Send Credit Balance Update tag. And I use the Wordpress action hook of updated_user_meta to trigger that function. If the user meta field of “credit_balance” has been updated, it triggers my function.
That code will add the tag to their CRM profile. Which, in turn, triggers my automation.
Wrap It Up!
If you’re technically inclined and familiar with using automation tools, then you can see that this isn’t exactly a complicated setup.
It has evolved since I originally built it. It changed when I made some tool changes. I also use to have two different sets of credits (for difference services) but decided to simplify it into one.
A system like this could be extended and made more involved. For instance:
- You could use code and/or automations to do automatic credit debits based on certain actions. Like I said, I decided not to so I had more control over it. But, it wouldn’t be too difficult to automate debits, too.
- You could use a custom post type instead of the ACF repeater field for the debit log. This would give more fine-tuned control over the presentation of the log as well as make it easier to do automated log entries if you were to do automated debits.
- You could gamify the system with GamiPress and, once they reach a certain number of points, you could automatically add a service credit to their account.
- You could make special offers to bundle service credits into a sale. Technically, it would be as simple as incrementing the custom field when they purchase your special offer.
All in all, though, this is one of the things I love about Wordpress and the ecosystem of tools available or it. You can expand the system to do whatever it is you want it to do.
Now, I think I have included enough information in this post where one could re-create this system for themselves if they have the right tools and adequate technical knowledge.
But, remember, I can help you build it. 🙂
If you would like my help implementing this in your business, you can pick up some technical service credits and we’ll get in there and build it for you.
If you’ve got the tools to enable it, I estimate it would take about 2-3 service credits to build it for you. Your best bet would be to pick up a 3-credit package to get it done.
Keep in mind, you don’t need to use the exact same tools I do. The methods will be mostly the same, but you can use other tools in most cases. If you’re wondering if the tools you’re using could be used, just get in touch and ask. I’ll help you figure it out. 🙂
Update 3/20/2023: Updated to include updated information on conditional content in the block builder after I switched to Kadence theme. Also included a table of contents and fixed a few things.
Got A Question? Need Some Assistance?
Have a question about this article? Need some help with this topic (or anything else)? Send it in and I’ll get back to you personally. If you’re OK with it, I might even use it as the basis of future content so I can make this site most useful.