The Marketer’s Guide To How To Leverage Your Blog Categories
Most blog owners end up wasting a huge opportunity when it comes to how they use their blog categories. This post will discuss how to truly LEVERAGE your categories into powerful vehicles for marketing.

When’s the last time you actually put much thought into the categories you use on your blog?
Most likely, not since the day you originally set the thing up. And it probably looked something like this:
- “What topics do I expect to write about on this blog?”
- “OK, cool. Let’s make a category for every… freakin’…. one of them.”
And so you did. And probably, over time, you added even more because you wrote that random post which doesn’t seem to fit into any of them.
So, in other words, you’re using your categories as little digital filing cabinets.
Now, look at the front-end of your blog. The part the world sees. What happens when a person clicks on one of your categories?
Most likely, they are presented with a big, honker list of posts from that category.
.
What if I told you there was a better way? A more strategic way. A way which will actually help you build your list and make more money. And, actually keep things SIMPLER.
That’s what this post is going to cover. Here’s how you will turn your blog categories into money-makers.
OK, let’s do it.
That’s One Freakin’ Awesome Marketing Platform You Got There
I’m currently in the process of re-working a bunch of how my email list system interacts with this blog. I won’t go into much of it yet (since it is a work in progress), but here’s the basic idea…
Blog + Trigger-Based Email System = Freakin’ Awesome Marketing Platform
(Yes, that’s the super technical version of that equation).
See, the blog is supposed to build your email list. Additionally, we know that list segmentation is super important. After all, if you send the exact same message to every single person on your list, you’re a lot more likely to lose their interest and burn them out.
Now, with standard linear email marketing systems like Mailchimp or Aweber, the way you would accomplish segmentation like this is by using multiple email lists. You could also use one list and just include a hidden form field on the opt-in form which you could segment by, but you’d still be forced to send the same followup sequence to every person on the list. So, effectively, multiple lists is what you gotta do.
A trigger-based system which uses tags (ala Ontraport or Infusionsoft) gives you a LOT more power. You can tag people based on what they do, where they opt-in… essentially anything you want.
Moreover, these systems can actually react based on what people do on your blog. So, not only does the blog get them onto your list to begin with, but your blog can also serve as a 24/7 lead segmentation system.
This turns your blog into a freakin’ awesome marketing platform. 🙂
Think about it…
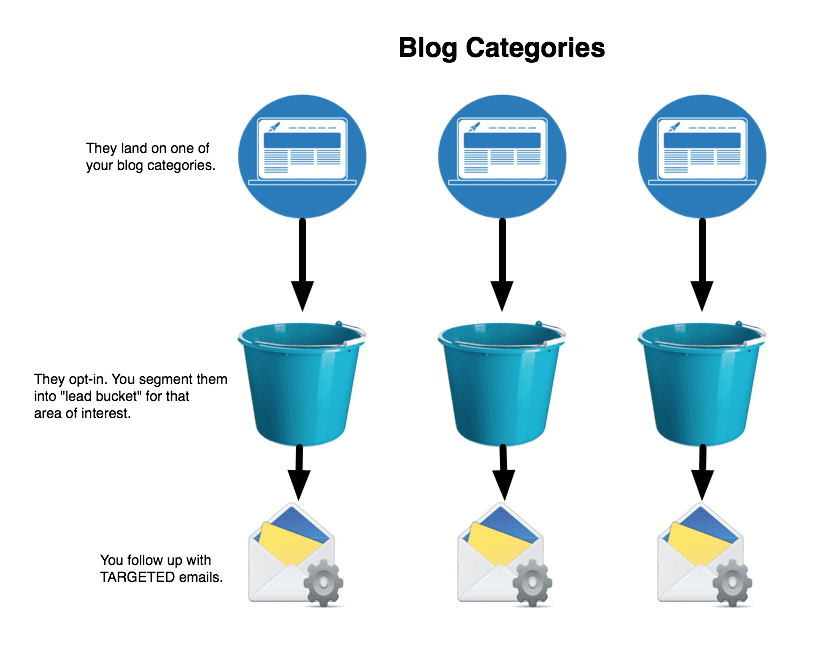
If your system notices that a person keeps visiting blog posts about topic X, then you know that person is pretty interested in topic X. Your system could tag them automatically as interested in topic X and send them TARGETED followup emails based on their interest in topic X.
This is how you build an effective, but targeted backend business funnel behind your blog. Want to know how that fits in? Review this post about the blog revenue monetization funnel again.
OK, onward…
The Concept Of Lead Buckets
List segmentation. It is our way of categorizing leads based on their area of interest.
Isn’t that kinda what we’re doing with blog categories? Except we’re categorizing blog posts.
How about we mash those concepts together?
 Take your primary blog categories and set them up such that they automatically place your incoming leads into little “lead buckets”. Those “lead buckets” would be list segments, each with an ability to follow up in a targeted manner.
First, let’s review one of my past blog posts. Its important. That post is…
The Strategic Way To Define Your Blog Categories – (opens in a new window)
So you specifically map your blog categories to specific benefits that your target market is looking for. Specific pain points where the content within those categories are aimed at presenting solutions to that pain.
To keep it simple, you should probably try to keep your list of categories at 5 or less. If you can’t do that, it is because you’re thinking about your categories all wrong.
If a reader opts in under a certain category (or they keep visiting posts from that category), then you can place them into a little lead bucket mapped to that category.
If you’re using Aweber or something similar, then you could create a different opt-in form for each category. That would put people into list segments based on that category. If you’re really in deep with Aweber (and they are a great company, so I wouldn’t blame you), you can check out an Aweber add-on called AW Pro Tools, which will allow you to tag and segment with Aweber.
If you’re using Ontraport or Infusionsoft, then you would tag the person based on the category they come in on. You can take it a step further by automatically tracking what they read on your site and proactively adding additional tagging based on their behavior.
Creating A Category Landing Page
When you’re thinking of your blog as a freakin’ powerful marketing platform, then I hope one of the first things you see is that the typical blog category page is a huge waste of space. Simply listing out posts from that category accomplishes nothing.
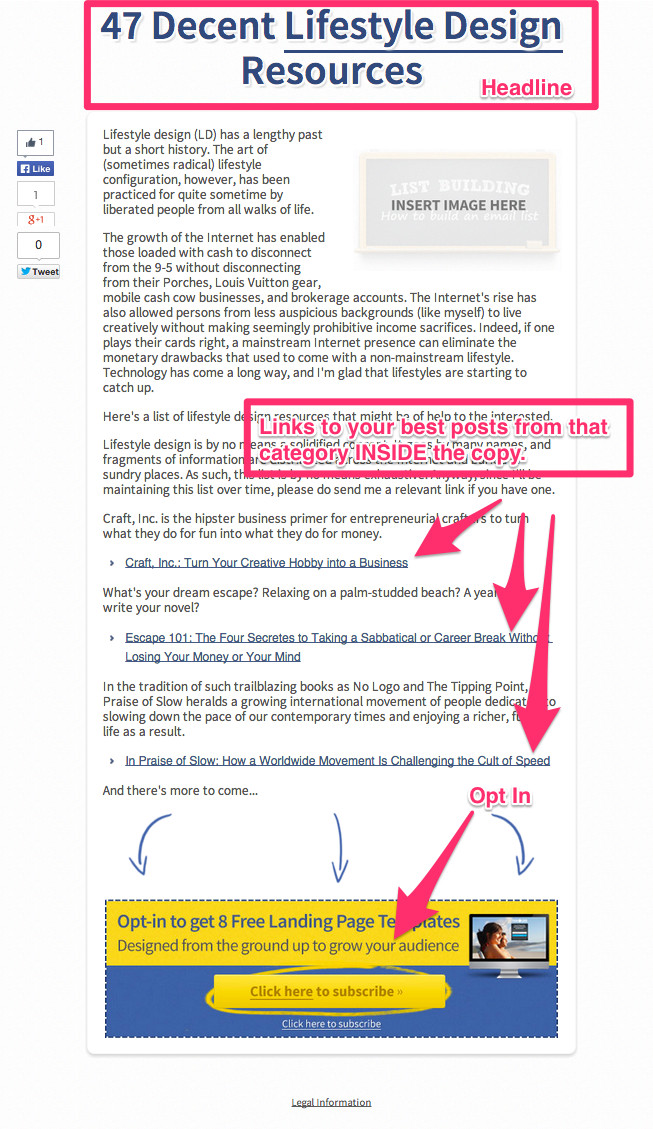
Instead, let’s set up each category page as a LANDING PAGE. And each category landing page would contain:
- A short introduction to the material (aka intro copy)
- An opt-in form (and you want this opt-in form to specifically segment people based on that category)
- A list of your BEST content from that category. Not just the latest posts, but the BEST posts. Hand-pick them.
Essentially, you’re turning each category page into a squeeze page. The one difference between a standard squeeze page and this category page is that you’re going to include links to other blog posts from that category (whereas typically you wouldn’t do that as it would decrease your opt-in rate).
You could even include links to relevant products if you wanted to.
How To Create A Category Landing Page
You’ve got a few different ways to go about it.
First, if you have a LeadPages account, they’ve got a template called “SEO Blog Category Page”. It looks like this:
You would just create the page inside of LeadPages, then use their Connector plug-in to map that page to a page on your blog. Then, wherever you would link to the blog category, you link to that page instead.
If you don’t have a LeadPages account but do use OptimizePress, you could also use that to create a category landing page using the Live Editor. (Seriously. I’ve been using OptimizePress a lot lately and I really like it. Extremely flexible.)
If you have no landing page tool, then you could create a simple page and simply use that. Just write the page the way you would any other page. If you have a problem getting opt-in forms to appear within the content, you can use the Global Content Blocks plug-in to easily insert formatted opt-in forms right into your post (in the editor).
Now, all of these methods above will give you a PAGE which you would use for your category. Thing is, by default Wordpress uses it own “archive” template to display category pages. So, any place where Wordpress automatically inserts category links (i.e. in your post’s meta information), it wouldn’t properly use your nice landing page. It’d still link to the standard archive page.
In order to fix that, you’ll have to dive into just a little bit of techie stuff. Here’s a couple of handy links if you want to dive into that:
- How To Create Category Templates in Wordpress (from WPBeginner)
- Create A Custom Category Page (from Your Website Engineer)
Inside the content of the custom category template you create, you just include all the custom stuff I talked about above.
Tip For People With Infusionsoft Or Ontraport
One of the beauties of these systems (and other CRM packages can do it, too) is that you can track behavior of your leads and react accordingly. So, you’re not limited to simply segmenting them based on the form they opt-in with, but you can effectively place them into lead buckets after the fact.
The way you do it is with URL tracking. You set up a rule such that whenever a contact visits a particular URL, a certain something you specify happens automatically. In the case of our blog categories, you could set your system up to track repeat visits to posts within certain categories. And if the number reaches a certain threshold, you could follow up with them accordingly (since they have demonstrated higher interest).
URL tracking usually uses pattern recognition on the URL. And the last thing you want to do is have to create a unique response rule for every single blog post you publish. So, the answer would be to use a naming convention with your blog posts.
(Trust me, I wish I had been doing this with this blog a long time ago. Now I have over 1,000 blog posts where I wasn’t thinking about URL conventions so it would be a pretty big job to retroactively apply it).
If you have just 4 or 5 different lead buckets, then you assign each one a keyword. Then, you edit the post slug to put that keyword at the beginning or the end of the URL. For instance, this very post currently has the post slug of “category-landing-pages”:
![]()
If I wanted people who read this post to be placed into a “lead bucket” on the proper way to set up their blog… for people who are interested in best on-blog marketing practices… then I could edit that slug to contain the lead bucket.
First, I’d want to know what my lead buckets would be. As I said above, this is all stuff I’m currently in the process of doing, but let’s say my lead buckets would be:
- Platform
- Engagement
- Conversion
- Traffic
- Delivery
See, I would want to keep the name for each “bucket” simple and keyword-based. So, any post which would be in the “Platform” category would help target people into an interest of people who want to know more about how to set up their platform. And this very post would probably fit that bill. So, I could do something like this:
![]()
Edit the slug and insert the prefix in there.
Alternatively, you could also set up your Wordpress permalinks to always include the category in the URL:
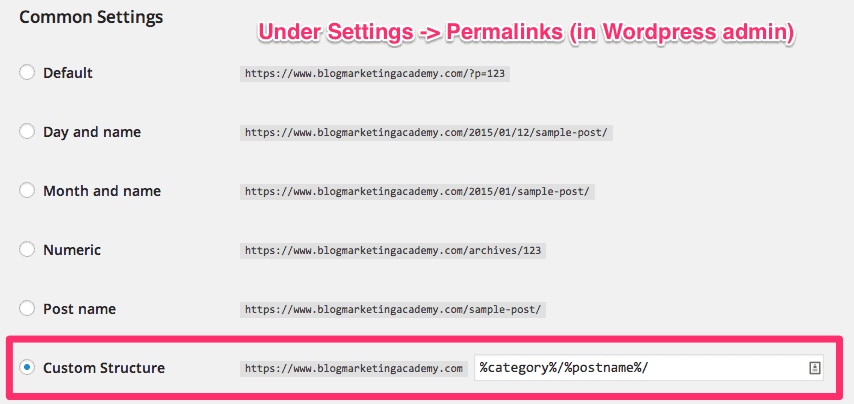
Now, I can set up my Ontraport account such that anytime the word “platform” appears in the URL, it would respond accordingly (tag them, place them into a sequence, etc.)
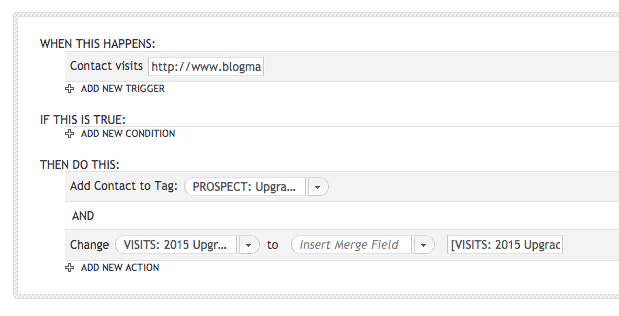
With Ontraport, you would need to use a wildcard in the URL field. So, if I wanted to assign every person who visits a blog post in the “Platform” category to a platform lead bucket, I would need to set the trigger to
Contact Visits: https://www.blogmarketingacademy.com/platform-*
This would catch any URL with “platform” at the beginning of the post slug.
Conclusion
The money is made from a blog by way of the business backend which takes place behind the scenes. A LOT of the heavy lifting of that backend is going to be way of your email followups.
As you can see with this post, there’s quite a bit which can be done with the actual SETUP of your blog so that your blog serves as a very fundamental component of your marketing.
A blog truly is a freakin’ powerful marketing platform. It is all about how you execute on it. 🙂
[contentblock id=23 img=html.png]

David Risley has been building on the web since 1998 and founded Blog Marketing Academy in 2008. After years helping bloggers and online entrepreneurs grow their businesses, he now runs Concierge — a done-for-you WordPress management service for membership sites and online businesses. He manages hosting infrastructure, handles the technical heavy lifting, and keeps client sites running at peak performance. Click to read his full origin story.