First Step: Resurrecting A Dormant Blog From The Dead [10X Blog Traffic Challenge]
As the first step of 10Xing blog traffic to a blog which has been dead for a year, it is time to breathe new life into it and fix the tech. Here’s what I did to fix the theme, warm up the email list, and begin to make this site alive again.
After really spotty blog post frequency, followed by a year of silence, I decided to revitalize my hobby blog from the dead and 10X the traffic.
That blog is Happily RV.
This is a hobby for me. And I wanted to do it in a market which has nothing to do with online marketing.
As I covered in my last update, the blog saw an uptick in traffic starting around April 2020. Despite that, it was still in the double-digits on daily traffic. Averaging only about 77 page views per day.
The mission is 1,000 page views per day. Hopefully higher after that, but this is the goal for now.
So, where do I start?
Here’s my first report on what I have done with the site since I decided to take this on.
Step 1: Switch To Thrive Theme Builder
The blog was running on an old Thrive Theme. It was called FocusBlog and was one of their legacy themes that is no longer available unless you’re a Thrive Member.

The old layout of Happily RV. Yuk.
Since I last did anything with the site, Thrive Themes had released Thrive Theme Builder.
I love Thrive Theme Builder (read my review) and I think it is perfect for a site like this one. So, my first step was to switch the site over to Thrive Theme Builder.
I use WPX Hosting for my hosting. So, the first thing I did was head into my account at WPX and create a staging copy of HappilyRV so that I could mess with the site without doing so publicly.
I then installed Thrive Theme Builder to the site and I was live on “ShapeShift”. I went through the wizard and picked some starter templates, then did some customizations. The result:

The new starting layout for Happily RV.
Thrive Theme Builder is really quick and easy to use and, basically, I made the transition with no more than maybe 3 hours of work. This kind of design would have taken a LOT longer otherwise. In fact, one of the reasons the old layout (based on FocusBlog) was getting dumb-looking is because it was so much hassle to make customizations. With Theme Builder, it is child’s play.
After getting the new layout to a workable state (not perfection, but just good enough to be public), I merged the staging site back to LIVE and I was up and running. I can (and likely will) make more visual changes over time.
Step 2: Post Something. Anything.
The site had seen no content for over a year. And my next step was going to be to email my dormant email list. I needed to have something to say. 😉
So, I posted something super simple. My goal was just… breaking the silence.
Step 3: Email My Dormant Email List
At this point, I didn’t even have opt-in forms up on the new blog layout. But, my email list needed to be resuscitated.
Reengaging a dormant list is a multi-step thing, but it starts with emailing them something. Obviously. 😉
My last broadcast to that list went out to 1,147 people on May 18th, 2019. Here in July 2020, the list had grown a bit to 1,283 people.
They had opted in (mostly) for my RV Buyer’s Checklist lead magnet. It is a good lead magnet and it performed pretty well. I don’t have any stats for you on that since I turned off all the opt-in systems (I am planning to set up the new opt-in system on ConvertBox).
But, this email list hasn’t heard from me in quite awhile. Some of them have never heard from me. No doubt that many are going to wonder who the hell I am when I do email them. But, it needs to be done.
So, the plan is to do a simple re-engagement campaign to the email list. See who opens or clicks. Then relentlessly prune and delete everybody who doesn’t respond. The list will likely be much smaller when I’m done, but it is necessary.
So, I created an email broadcast to send out to my list. Here is that email…

That email went out to 1,283 people. I let that sit there and percolate for a couple days. 😉
In the meantime…
Step 4: Create Some Kind Of Content Plan
OK, the last thing I want to happen here is for me to resurrect this blog from the dead only to let it go dormant again.
At this point, I don’t have any kind of set posting frequency in mind. We’ll see how that pans out. But, I know full well that I need a pool of content ideas to draw from.
So, I made a simple “idea file” on future content ideas for Happily RV. Back in the day, I remember giving advice about keeping an “idea file”. And I said that one of the tests of whether a niche is a good fit for YOU as a blogger is whether or not you could create an idea file of 50 blog post ideas without too much trouble.

52 items on my idea file 🙂
Today, I still think this is a good idea for 2 reasons:
- It can keep you from blindly attempting a niche as a blogger when, really, you only had a handful of solid blog post ideas and don’t really have the passion nor knowledge to do it for the long haul.
- It can remove the pressure of what to say on your blog for quite awhile, depending on your post frequency.
With 50 blog post ideas, I would have content for about a year if I am on a one-a-week strategy. Plus, I’m sure new ideas will pop up over the course of the year that I haven’t thought of yet.
So, I sat down and created my idea file. And yes, I was able to get to 52 blog post ideas without too much hassle. Most of them I just thought up on my own, either by things I have been interested, things I’ve done to my own RV, etc. For others, I went to some of the big RV forums and checked out some of the topics being discussed and then noodled that into a post idea.
Overall, I would say I spent about an hour listing out blog post ideas.
Step 5: Put The Email Opt-in In Place
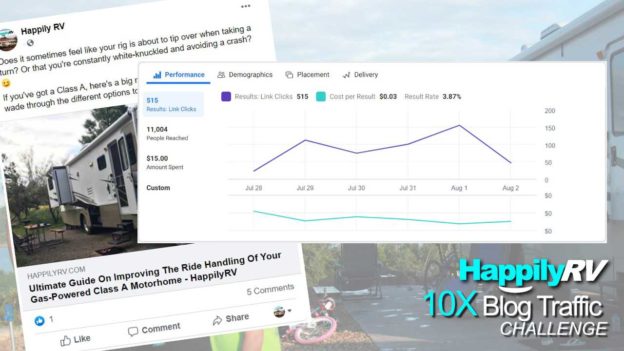
When I first started up this site, I made the decision to set up a cheap Facebook ad campaign that offered a lead magnet to RVers. It worked like gangbusters and that’s why this little hobby site has a decently sized email list for the traffic.
When I went live with the new design based on Thrive Theme Builder, I did it without building in any opt-ins. I did that for the sake of speed.
But, it would be a bad idea to go for very long that way. 🙂
Since I now use ConvertBox for all of my on-site marketing here on the Blog Marketing Academy – and the fact that you can run more than one site through an account – you better believe I am going to set up my list building for HappilyRV using ConvertBox. 🙂
First things first… I need to update my primary lead magnet. The lead magnet I used originally was a Pre-Purchase Checklist. This was a checklist of a bunch of items to evaluate as you are walking around a potential motorhome purchase.
I needed to update this lead magnet (I have learned a lot since I originally created it) as well as update the branding and the imagery for it. So, I did. 🙂

I have more to do, but so far I have set up just one optin form that offers this lead magnet.
It is an embedded ConvertBox form that I put into the sidebar of Happily RV. Really, super simple. I can (and will) get more advanced with my optin strategy soon.

What Now?
This is definitely going to be an ongoing and more long-term project. 10Xing my web traffic isn’t something that happens overnight. But, the first step was to get the “tech” of the site back up to date.
There’s still more to do on that front. Such as:
- Developing my optin strategy more… since one little sidebar form isn’t gonna do it. 🙂
- Take stock in what is happening with the social media accounts for this site.
- Figure out what my social strategy is going to be
To continue to stay updated on the project and follow along, be sure to be registered with the community. A free Starter membership will do, so there’s nothing to buy.
Oh, and soon, I’ll update you on what happened with that first re-engagement email to the list. The results are still coming in. 🙂
Tools I Am Using (So Far) In This Project
- Thrive Theme Builder. I have built my RV blog with Thrive Theme Builder. Read my review. Also, I’ve got a free bonus course for you.
- ConvertBox. I am using ConvertBox for my list building. Read my review. Also see my free bonus course on ConvertBox.
- I am using WPX Hosting. Best support I’ve ever had from a hosting company. Read my review.
- Drip. Since I use Drip here at BMA, I have decided to use it for the RV site, too. If I didn’t have Drip already, I would be using ConvertKit.

David Risley has been building on the web since 1998 and founded Blog Marketing Academy in 2008. After years helping bloggers and online entrepreneurs grow their businesses, he now runs Concierge — a done-for-you WordPress management service for membership sites and online businesses. He manages hosting infrastructure, handles the technical heavy lifting, and keeps client sites running at peak performance. Click to read his full origin story.