The Ultimate Blueprint To Building Your Membership Site
This guide will walk you through a membership site build, complete with all the plumbing that makes it work.

Building a membership site is incredibly popular, but can also be a bit technically overwhelming. So many different tools and all of the plumbing to put it all together.
Plus, you’ve got all of the various tool options. Which membership site plugin do you get? Which theme do you use? How do you handle recurring billing? What about online courses? What emails do you send to members and when do you send them?
The list goes on.
I build membership sites all the time for clients. So, what I’d like to do is offer up a blueprint for building a membership site.
I will walk you through each component. Making them work together. The email sequences. The pages. All of it.
You can look at this like a guide. I can’t possibly cover every little aspect because every site and every market is a little different. But, I will show you how a lot of the plumbing works.
I also want to be clear…
This is clearly not the only way to build a membership site. There are other tools. There are even third-party services that purport to automate the entire thing. But, the tools and build-out that I use is solid as a rock. It is what I use. And I will also explain my reasoning.
My Guiding Principle On A Membership Site Build
One of my top goals any time I build a membership site is what I refer to as digital sovereignty. In other words:
- I do not like to involve third-party, remote services if I can avoid it.
- I don’t like building a site on “rented land” (aka a subscription service) that if you cancel threatens your business operations.
It is for this reason that I build fully-functional membership sites within WordPress itself. And I try to avoid use of third-parties such as remote email list hosts.
I have nothing against third-party services like ActiveCampaign, ConvertKit and the like. I also fully recognize the convenience of third-party shopping carts like Thrivecart. These tools, in some ways, can remove some of the complexity out of building a membership site and ensuring everything just works. However, it also means that the data that makes your online business work is spread out across multiple locations. It also usually means that if you stop paying for one of those services, a large aspect of your business needs to be migrated or re-built.
Building a membership site with digital sovereignty as a guideline means that no aspect of your business is on “rented land”. And remote services you do use are interchangeable relatively easily. It also means all your important data (like account histories, email list, automations, etc.) are all in-house and can all be backed up at once. Things are not splintered.
It doesn’t mean you don’t use any third-party services. We will, of course, be using payment systems like Stripe. You will be using a service to send your emails. But, your DATA is all safe, secure, backed up and cannot be removed.
Related Workshop: Digital Sovereignty MasterClass. Understand the 8 core principles of digital sovereignty and then do an evaluation of your own business to find the points you may want to reorganize. Click to learn more.
The Fundamental Architecture Of Your Membership Site
There are two primary architectures you can use as the basis for your membership site. It boils down to how you will protect member content. They are:
- Membership levels
- Tags
A site based on membership levels is the kind you see quite often. You can think of the classic example of 3 different membership levels of bronze, silver and gold. Then, depending on which membership level they enroll in it will unlock certain features of the site.
Many classic membership site plugins for WordPress are built around the idea of levels. You have a list of members and each member can be assigned one or more membership levels. You then protect content around your site by saying which member levels are allowed to access it.
A tag-based architecture is a little different because you’re not placing each member into official membership levels. Instead, you simply add or remove tags from the user’s profile in your CRM. By using tags, you can slip people in and out of different content protections using marketing automations… simply by adding or removing tags.
In my experience, a tag-based approach offers better power and better flexibility for the future.
By being able to employ marketing automations and tags, you can change your membership site in any number of ways using any marketing sequence. You can show or hide various aspects of your site based on tags. You can literally make your site change on a per-user basis depending on any followup marketing you may have going on for them.
This is a more powerful approach than using standard membership levels.
The Tools And Plugins You Will Need To Build Your Membership Site
As I said at the outset, there are many different approaches to building a membership site. But, I think a tag-based architecture is preferred. Plus, I want to use tools which don’t rely on third-party services.
So with that in mind, let’s go over the main tools I recommend and why I prefer them over the others.
WooCommerce + WooCommerce Subscriptions

For the most future-proof and flexible payment platform, I recommend using WooCommerce. And if you need recurring billing, then the WooCommerce Subscriptions plugin works very well.
WooCommerce is extremely flexible and it can be used to sell practically anything with any billing setup you wish. It has tons of plugins that can change the way it works to your heart’s content. Not only that, but because it is such a standard, you will find no shortage of tools that integrate with WooCommerce.
I do not recommend a membership site plugin for this because most of their payment setups are pretty rudimentary. They also usually lack powerful features like upsells, one-click upsells, order bumps, etc. With WooCommerce, there are a number of add-ons that can enable that (such as CartFlows). If I had to pick an official membership site plugin, I’d probably go with MemberPress as I find it to be reliable with a lot of third-party support. However, for me, WooCommerce is the most future-proof way to go.
I also do not recommend anything that is remotely hosted. Many carts like Thrivecart can handle recurring billing without any issue. However, the issue there (other than loss of control) is that the billing history is not in-house. It is awkward to have members go into a third-party site to manage their accounts.
Also be careful with hybrid options that use a WordPress plugin while also outsourcing core aspects to third-party servers. SureCart is one such option. While it is a great solution in and of itself, I personally would not use it because core functionality is done on their servers.
So, after trying and/or actually using multiple options for membership site payments, I recommend WooCommerce with the WooCommerce Subscriptions add-on.
RELATED: Choosing An Ecommerce Platform For Your Online Business (And My Only Recommendation)
FluentCRM
Your email list setup is going to be pretty fundamental to how your membership site will work. I also want to keep full control over this important asset rather than having it hosted elsewhere.
I use and recommend FluentCRM.
With FluentCRM, you have a full, natural and tight integration with the rest of WordPress because it all works right there. You can send one-time campaigns, email autoresponders, as well as full visual marketing automations. Your list is all right there in your control.
FluentCRM also naturally integrates with WordPress user profiles and that’s how you get the membership site functionality (along with my next recommendation). FluentCRM literally becomes your member database. They do not NEED to have a user profile if you don’t want them to. They could just be an email subscriber. But, if you want them to have a user profile and log in to get member-protected resources, it is super easy.
FluentCRM has quite a tight integration. You can view their full order history right inside their profile. You can set tags whenever they buy certain products. You can trigger any kind of marketing automation based on their orders. It is highly flexible.
But, for our full membership site stack, there’s one more component I definitely recommend.
WP Fusion

WP Fusion is pretty much the perfect membership site plugin… even though it isn’t really positioned as one.
What WP Fusion does is sits there in the middle and integrates practically everything with your CRM. In this case, our CRM will be FluentCRM and WP Fusion works very well with it.
Through WP Fusion, we can add/remove tags based on almost anything our member does. Across a LARGE number of plugins you may end up using. And then, by using those tags, you can build and trigger any automation you wish.
WP Fusion is the glue which makes it all work.
WP Fusion is also what you will use to protect all membership site content. By selecting what tags they need to have on their profile to access certain content, you can easily grant access (or remove access) to content across your entire site through visual marketing automations.
Your Membership Site Theme
I’m not as picky about one’s theme for their membership site because everybody has different goals there.
My personal preference is Kadence Theme. Specifically, the Pro version of both the theme and the Kadence Blocks plugin. Kadence makes it easy to create any kind of site you wish using the native block builder of WordPress. It is also incredibly performance friendly. The Pro version of Kadence also has some functionality which is quite convenient for membership sites.
If you are looking to build a community-focused membership site, then the BuddyBoss theme works well. I have called it the “perfect” membership site theme and, in many ways, it is. You should only consider using this theme if you’re planning to use the BuddyBoss platform and build out a site with a lot of community functionality. BuddyBoss is inherently needy when it comes to performance requirements. The theme is also not very easy to modify and one usually ends up using Elementor on top of it (which brings it’s own performance issues).
Technically speaking, you can use almost any theme for your membership site. If it suits your purposes, it should work fine.
For me, however, I use Kadence more than anything else.
Fluent Forms For All Your Forms
For all your forms, I recommend Fluent Forms. Not only is it a highly powerful forms plugin, but it integrates beautifully with our tech stack. Consider this…
You would be able to visually see every single form submission – across your entire site – inside of a user’s profile in FluentCRM.
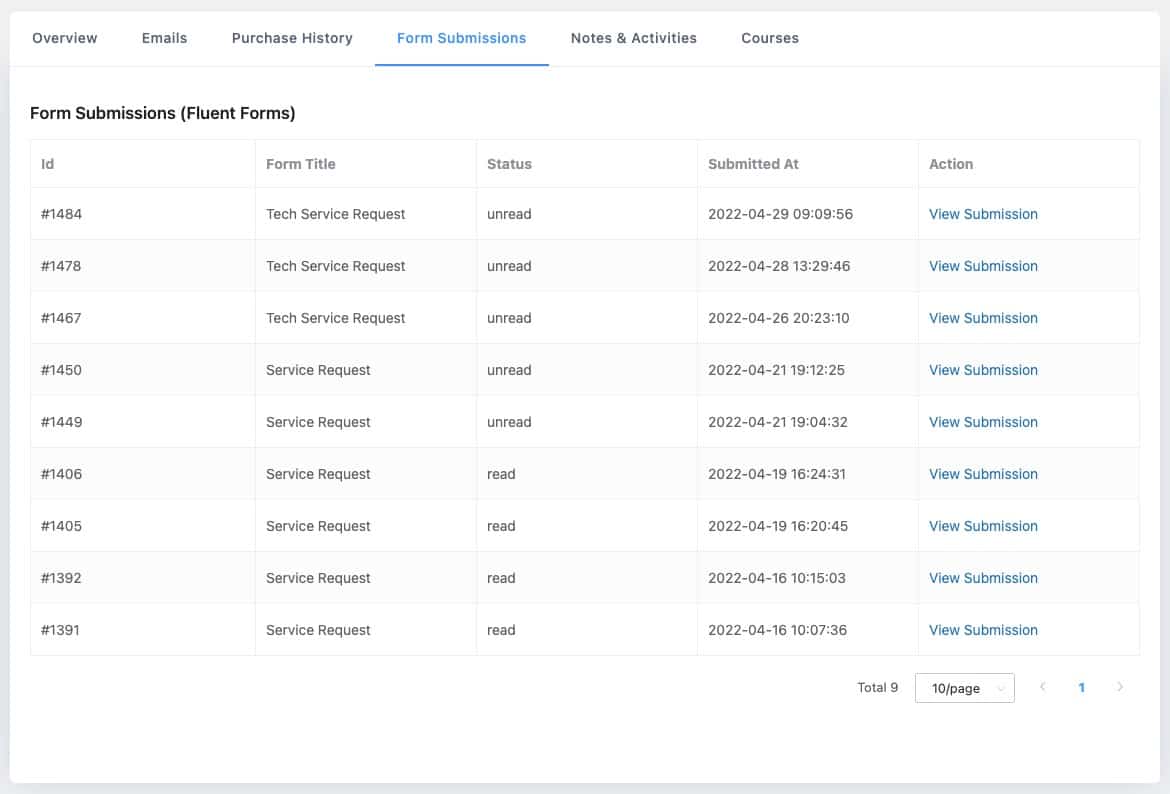
You can pull up a member profile and see everything they submitted via a form built with Fluent Forms. Any quiz, survey, contact form… anything. No need to manually search through form entries.
Online Course Options
Not all membership sites have to be a home for training courses, but it definitely pretty common. If you want to have training courses for your members, then you need to decide what kind of functionality you need. For instance…
- Are your courses going to be big, multi-module creations with a lot of parts?
- Do you absolutely need student progress tracking?
- Do you need typical school functionality such as assignments, grading, quizzes?
In practice, I find that a lot of people think they need more than they really do. Or they think that someday they may want all those fancy features, but in reality they just never get around to actually using it.
In most cases, an online course can be really simple. Essentially, just a collection of pages. With a video and text and perhaps some links to some downloads. In some cases, the course can literally be just one page. In other cases, maybe you’d want a hierarchy so you can put sub-pages (for individual lessons).
If you don’t need the fancier stuff, you can forgo getting any learning management system plugin such as LearnDash or TutorLMS. Instead, we can just create a custom post type for our courses. Build a nice look and feel for it with Elementor or Kadence. Protect it with WP Fusion and call it a day.
If you just want a nice, structured environment for managing your courses, then the free version of TutorLMS may be all you need.
I don’t recommend just blindly going and paying for some fancier LMS plugin unless you’re sure you need all the functionality. I’ve seen so many people install big LMS plugins just to organize content into courses, but they’re not even really using 90% of what that plugin can do. It is a waste of money in that case.
The Pages You Will Need For Your Membership Site

It goes without saying, but obviously you will need to install WordPress and install the plugins mentioned above. But, once you do that, you’ll then have a blank slate. Now what? 🙂
Well, there are certain core membership site pages you will typically need. They are:
- Site homepage (usually a nice landing page that spells out what you do and has a call to action)
- About Page
- Contact page (obviously)
- Login (ideally styled to match your branding rather than default WordPress)
- Logout (optional, but nice to direct members to a page when they log out to acknowledge they’ve logged out and perhaps promote your latest blog posts or give a promotion)
- Member Dashboard (the page they will go to when they log in. Serves as a central place to find membership site features. Can repurpose the “My Account” page to serve as dashboard with a few modifications.)
- Course Library (if you have multiple online courses, it would be good to have one central library where they can find them all)
- My Account (place for members to view their order history, their subscriptions, and generally control their account. With WooCommerce, this page is automatically created but can be modified to suit your purposes).
- Sales Page(s). The main landing pages for actually signing up for the things you are selling, whether a full-blown membership or individual products. While WooCommerce will give you product pages by default, it is nice to have dedicated landing pages for them.
- Access Denied page. While you may indeed direct people to individual pages if they try to access protected content without having access, it is nice to have a general page, too.
Now, certainly there could be other pages to your membership site. But, I generally find the above to be the core pages that almost all of them have.
If your membership is going to have community functionality, then there will be pages for things like forums, groups and the like. In most cases, the community plugin you are using for those features (such as BuddyBoss) will make those pages for you and you just link to them.
In all likelihood, you will have a blog on the site, too. Not all membership sites do. Some people like to separate their membership site from their public site… in which case there might not be a blog on the membership. But, if your membership site will also have a blog, then you will need a blog index page for people to find your blog posts.
Linking These Pages Together
So, you create these pages for your site. The login page is automatic, but you may want to style it to make it look better than a WordPress default. Your Account page will be automatically created by WooCommerce. The others will need to be created as pages inside of WordPress.
But, then there’s the matter of putting it all together into an architecture.
Navigation Menus
Your main header navigation is typically going to be a pretty core component for how people get around. You can just use the standard built-in menu functionality of WordPress to build your menus.
But, how do you show different menus to people when they are logged in or not logged in? Or to paying members versus free members?
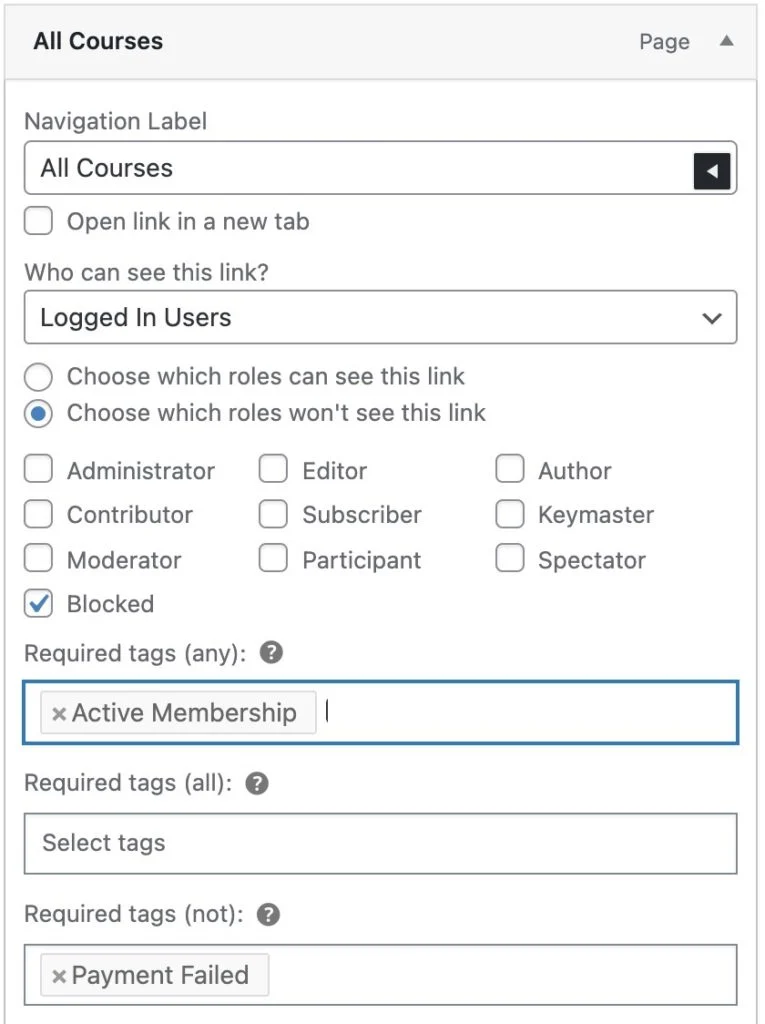
First off, WP Fusion has a global option in settings to automatically hide any content from the nav menu that the member does not have access to.

I usually keep this disabled, though, because I want non-members to see the stuff they’re not getting and perhaps want to buy it. 🙂
WP Fusion also enables you to control each individual menu item. You can specify if any menu item should be viewable by everybody, for logged-out users, or for logged-in users. And if they are logged-in, you can specify which tags they must have on their profile in order to see it.

For instance, you can place your member dashboard in your header navigation. But, set the visibility options to “Logged In Users” to ensure that a member has to actually be logged in to see the dashboard in the menu. If it is just a normal web user who isn’t logged-in, they won’t see it.
If you also install the User Menus plugin, you have even more flexibility. It integrates with WP Fusion further to provide even more granular control of menu items based on tags.
You can read more about WP Fusion’s menu item visibility here.
Instead of individually controlling menu items on the same menu, another approach is to show entirely different menus based on whether they are logged-in or not. The Conditional Menus plugin makes that pretty easy.
Login / Logout Functionality
When a member needs to log in, they should see a login page. When they are already logged-in, they should see a logout option.
Plus, how do you direct members to a dashboard when they log in rather than heading right into the WordPress dashboard or something equally weird?
Well, let’s set up that plumbing.
First off, you will be using WordPress’s default login functionality for your members. Typically, that’s going to use a script called wp-login.php, but that’s rather inappropriate to show people. So, I would rename your login URL. Personally, I use PerfMatters to customize the login screen to be “login”. So, that would make the login URL into www.yourdomain.com/login/.
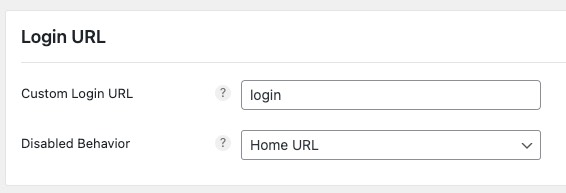
If you want a simpler way to do that, you can use WPS Hide Login to do the same thing.
The Admin and Site Enhancements (or ACE, for short) plugin is another handy plugin that does a number of things. I use it all the time. A few of it’s many capabilities are to change the login URL, add login/logout menu options, and redirect after login.
As I mentioned, it is usually more professional to customize the login screen so that it doesn’t have a WordPress logo at the top. Some themes will come with functionality for this (such as BuddyBoss).

There are also a number of plugins specifically for customizing the login screen, and you can even do it by way of code if you’re feeling a little nerdy.
As for login/logout links in your site navigation, some themes will come with this built-in. If your’s does not, the above mentioned User Menus plugin will help you create those links in your nav menu. The ACE plugin also has this option.
Directing Members To Dashboard Upon Login
How do you redirect members to a dashboard when they log in? It is actually pretty simple.
If you have not yet created a dashboard page, your first step is obviously to create one. 😇 Just create a page just like any other page. You can then design that page however you please. Typically, the dashboard would be used to provide a “hub” for the different parts of your membership site available to members.
Another option is to repurpose the “My Account” page of WooCommerce to serve as your member dashboard. I personally like this option because it provides that “hub” functionality of a dashboard with account functions. On my site, I use Kadence Elements to build my dashboard and “hook” it into the WooCommerce “My Account” screen. This puts my dashboard right there for all members.
Whether you build a fully custom dashboard page or repurpose the “My Account” screen, the next issue is how to ensure your members end up on this page when they log into their profiles.
If you are using the WooCommerce account page, it will automatically take care of this redirect. By default, Woo will ensure members are sent to the “My Account” screen. All you need to do is ensure that the correct page is set as your Account page in WooCommerce settings.

If you’re using a separate page as your dashboard, you’ll need to override the usual login process so that it will redirect to the page you specify upon login. LoginWP is one method. This plugin will enable you to set up redirect rules to control where people go when they log in. While it has a PRO version with a lot of integrations, their free version is adequate to create a global rule to send all non-admin logins to your member dashboard page.
The Admin and Site Enhancements plugin can also handle this for you. You can specifify your redirect URL as well as limit it to certain user roles.

You can also use a little bit of PHP code in your theme’s functions.php file or a snippets plugin such as FluentSnippets. And, yep, I’ll give you that code.
That code assumed your dashboard is at yourdomain.com/dashboard/. If your’s is different, change it in the code.
Lastly, WP Fusion does have an add-on for login redirects. Based on a user’s tag, you can send them anywhere you please. There’s no real reason for this if all you need to do is redirect everybody to one dashboard. However, this addon is VERY handy if you want to be able to control where people redirect to based on the tags on their profile. Potential uses include:
- Directing people to different dashboards based on their member level
- Directing people to onboarding pages on the first login only.
- Directing people to sales pages during marketing campaigns
All kinds of options when we’re using the right tools. 😎
Directing To A Logout Screen
One nice little feature is to have a logout screen, too. When a user logs out of their profile, you can send them to a screen you’ve prepared for them rather than some system-generated message.
While LoginWP can take care of that for you, I usually do it with another little blurb of code.
Obviously, change the page URL for that to go to your own logout page.
This page is good for showing your latest blog posts or perhaps some kind of unique offer.
User Profiles And User Permissions
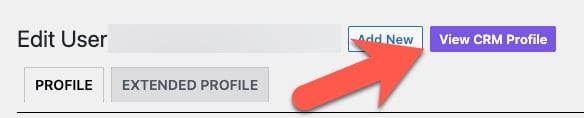
Our membership site is, at the core, going to be using standard user profiles built right into WordPress. FluentCRM will be how you manage everything, though. And WP Fusion is used to hook everything up.
Any member will, then, have both a FluentCRM profile and a WordPress user profile. They will be linked together through WP Fusion. And you can easily switch back and forth to view any member’s WordPress profile or FluentCRM profile.
Permissions will be controlled with tags. Using WPFusion’s content protection system, you will set which content is protected and which is not. For the ones that are protected, you will specify which tags should be used to grant access.
How Members Sign Up And Get A User Profile
Whenever a new member signs up (whether free or they’re buying something), they need to get a profile both in FluentCRM as well as WordPress itself. We know that WP Fusion will keep everything synced up.
So, there are two different approaches to creating a profile:
- Create a user profile and the FluentCRM profile is created automatically
- Create a FluentCRM profile and the user profile is created to go with it.
Both plugins have options to keep these systems happy and synched. In the WPFusion general settings, there’s an option to “Create new contacts in FluentCRM when users register in WordPress”.
You’re going to want that option enabled. Under Synchronize Contact Data, you’re going to want to enable “Sync profile updates and custom field changes to the user’s contact record in FluentCRM”.
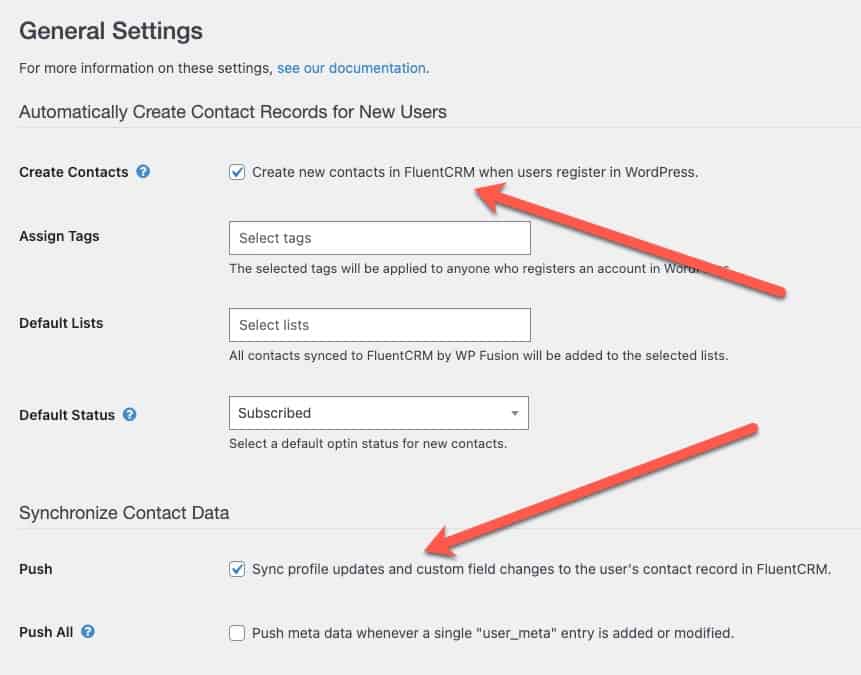
Note that FluentCRM also has similar options. Under it’s own General Settings, it can auto sync user data and contact data. It also has an option to automatically create new contacts in FluentCRM when a user registers in WordPress.

You can go either direction with this to create the link. Personally, I leave the FluentCRM options alone and just let WP Fusion do the work.
Now, your membership site will likely have different entry points for places where people can create a profile.
For members signing up for a free membership, you can either create a user registration form or an opt-in form. A user registration form will take their info and create a user profile directly, which will in turn create the CRM profile because of WP Fusion’s sync. With the opt-in form, you can use any opt-in form plugin you want to gather their name and email and add them to FluentCRM. Then, by using a marketing automation, you can just create their profile.

You can easily create a user registration form with a plugin like Fluent Forms. It works great. Any decent forms solution for WordPress will support user registration. You can also set a default tag in your WP Fusion settings so that every new member sent into FluentCRM will automatically get a free member tag.
For members who are buying something, you can have WooCommerce automatically create their user account during purchase. Plus, whatever product they purchased will have it’s own tags assigned, so that will determine what tags are added to their profile automatically.
My Recommendations For Member Signup
As you can see, there a lot of options for how you would like to have people get user profiles on your membership site. How you proceed depends a lot on your business strategy, but here are a few recommendations:
- The simplest option is to have all member levels require a purchase. In this case, run them though a WooCommerce purchase and that will take care of creating their profile.
- If you really need to have a free member level, I recommend having a controlled signup process via Fluent Forms. Enable the user registration capability for Fluent Forms and build your own signup form. It is much better than any default user registration form by WordPress. In fact, I would recommend you disable user registration in the WordPress settings and instead rely on your own custom sign up form.
- Keep in mind that you do not need a full user profile just to access protected content (such as lead magnets). This can just clutter up the database and in most cases they’ll never use the profile. Instead, try using WP Fusion’s Auto-Login functionality. See here: Subscriber-Only Content: How To Ensure Only Your Subscribers Can Get Your Lead Magnets
How User Passwords Are Handled
When a user registers a profile directly (rather than having FluentCRM create it with an automation), then you have the option to directly ask the person what password they’d like to set for their profile.
For instance, you can create a user signup form with Fluent Forms and have a password field that matches up to their password on their user profile. This allows for a user-selected profile.
Personally, I have the site auto-generate passwords. User profiles are created within a FluentCRM automation and I check the box to auto-generate the password.

This will then trigger the standard WordPress email with a password reset link to set their password as they wish. For one, this means one less field to complicate the forms. Secondly, it will help secure more secure passwords since many users have a tendency to select really weak passwords.
WP Fusion does have the ability to sync a password to a custom password field in the CRM and therefore enable you to send people their password in an email. There are two reasons I don’t recommend this:
- It presents a security issue to send a plain-text password via email.
- If they later change their password on their user profile, it will not sync up to FluentCRM anymore.
So, I just let WordPress auto-generate the password then they can reset it if they please.
Defining Your CRM Tags
Everything will be determined or triggered by tags. And when you first install FluentCRM, there will be no tags at all. It is a blank slate. So, once again… now what? 🙂
The first thing to keep in mind here is that you do NOT need to have your entire tag scheme determined right out of the gate. You can – and likely will – add new tags or change some as time goes on.
However, let me try to give you a little bit of guidance here. I tend to use tags for 3 different purposes:
- Permission Tags. These are tags I will add when people buy certain things. And they will be used, typically, to open up permissions to members-only content.
- Status Tags. These are tags we can use to track the status of a member, either by way of the status of their subscription, or their status as a prospect, or simply their status as a customer.
- Trigger Tags. These are tags used to trigger an automation, but typically don’t stay on their profile. We add them to trigger an automation then remove it again.
Now, let’s go into just a bit more detail…
Permission Tags
These are tags that you will add to their profile in order to grant access to things. These tags will be coupled with the WP Fusion content protection system so that when the tag is added, it grants access to certain content.
Likewise, if you want to remove access to certain content (such as in the case of canceling their subscription), you would simply remove the tag.
To determine what tags you need, you need to look at what you’re selling. You’re going to want at least one tag for each product you are selling, and a tag for each membership level.
To give a simple example, when somebody buys the ONEPass membership on this site individually, they will get a tag called “ONEPass“. That tag is then used to automatically grant access to all courses and members-only content.
With FluentCRM, you can have tags with spaces and symbols in the name. In other words, you can make tags pretty “plain English”. You can even give tags a description in case you forget what it’s for. 🙂 This makes it pretty easy.
So, you simply create a permission tag for each thing you’re selling. You can define which tag is added directly in the product settings of the thing they’re buying inside WooCommerce.

You’ll also notice that FluentCRM also provides a direct integration with WooCommerce so that you can apply tags on purchase. This means you actually don’t need to use WP Fusion for this purpose. Personally, however, I use WP Fusion since it offers more options (especially for subscriptions). However, you can go either way with it.
Status Tags
Status tags can be used for segmentation of general classifications of your users. Sometimes, based on those statuses you may trigger automations.
Here’s a few pretty typical status tags:
- CUSTOMER. You can have WP Fusion automatically add the CUSTOMER tag to anybody who buys anything at all. As a way to separate them out from free subscribers.
- CANCELLED MEMBER. If a member cancels their subscription, you can tag them accordingly. You can then use this to potentially target them differently with followup marketing.
- REFUND. Some businesses like to segment out people who ask for refunds and perhaps treat them a little differently. So, you can add a REFUND tag anytime you issue a refund.
- LEAD. If somebody takes an action on your site which makes them a strong potential lead for a product or service, you can tag them as a lead. Then use that to trigger followup marketing to close the sale.
The tags you use will be unique to your situation. You may have different lead tags. You may want to get more granular with it. Up to you.
Trigger Tags
One of the most common ways to trigger a marketing automation sequence in your CRM is by adding a tag to their profile.
In some cases, you would trigger an automation with a tag that will remain on their profile. For instance, if a person enrolls as a new paying member, you would tag them as a MEMBER and use that tag to trigger a welcome email, onboarding, or whatever you want. But, that MEMBER tag will remain on their profile as a permission tag for access purposes.
In other cases, you want to trigger an automation but you have no real reason to keep the tag on their profile.
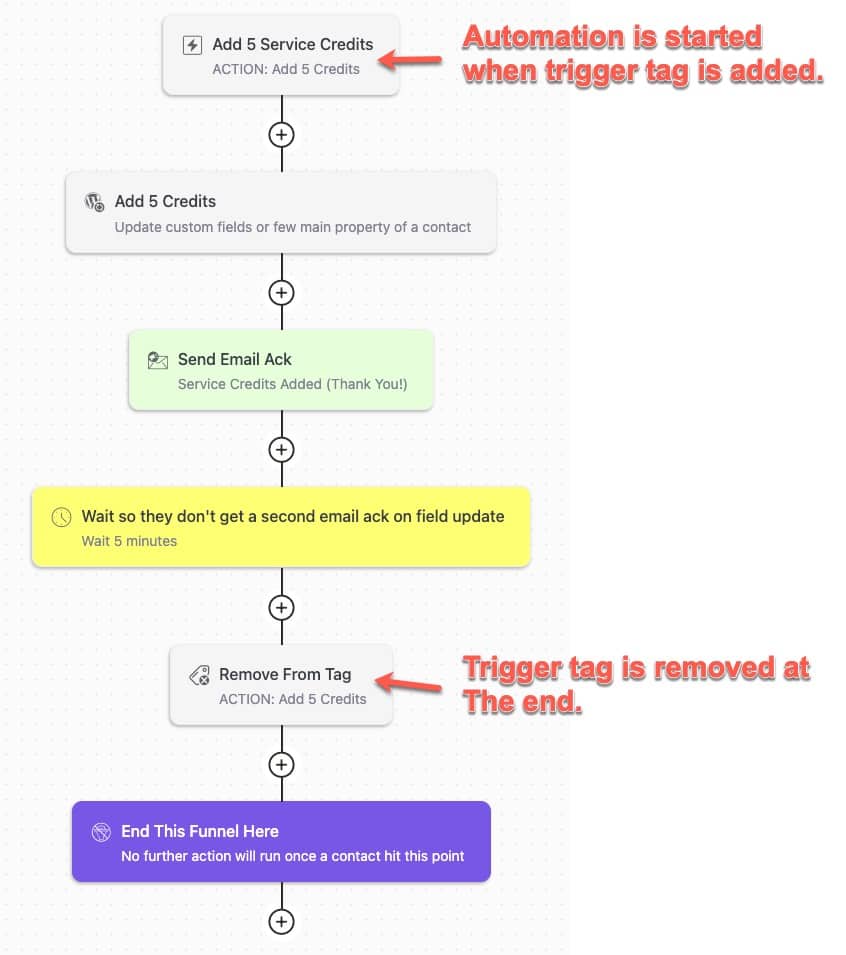
One example from this site is when a member purchases service credits. They make the purchase in WooCommerce and it will add a tag that says “ACTION: Add 5 Credits”. (if they buy the 5-credit package). That tag triggers an automation which will add the 5 credits, send them an email about it, then remove the tag.
You don’t always need to set up trigger tags in advance. You can usually just set them up when you need them.
Tag Naming Conventions
As your list of tags gets bigger, it can be easy to lose track of things. Trust me, I know. 😉
The best way to put a little order into it is by setting up a naming convention that works for you. I usually do this by adding prefixes to the tag names based on what the tag is for. This has the effect of having your tags show up grouped together in alphabetical order whenever you need to choose a tag from a dropdown.
Some naming convention ideas might be:
- CUSTOMER: [Product Name]. By adding the “CUSTOMER” prefix to each one, you are grouping all of your permissions tags for things people buy together.
- STATUS: [Status Name]. Grouping your status tags together. For example, you could use this for recurring memberships to record the status, such as STATUS: Active for active members and STATUS: Cancelled for cancelled members.
- TRIGGER: {What It Triggers]. You get the idea. 😉 You will then know visually these are trigger tags and it will be easier to select them in a dropdown. I sometimes also use “ACTION” as a prefix on my trigger tags to tell me it will trigger an action. You do what works for you.
You can always use your own naming conventions. You may have other methods that work better for you. But, it pays to think ahead a bit on this.
Good thing is… you can rename tags in FluentCRM. 🙂 So, even if you didn’t think this through in the beginning, you can go back and set up a naming convention.
FluentCRM also has the ability to put plain-English descriptions onto all tags. So, you can give yourself little internal notes on what those tags are used for. In FluentCRM, they call this the “Internal Subtitle”.

Email Sequences & Automations For Your Membership Site
We’ve now covered the basic core pages your membership will have. We’ve talked about how to link them together and control user flow through them based on their login. And we’ve talked about creating user profiles and the basics of using tags to control permissions and trigger automations.
You will be using Automations within FluentCRM to visually build these automations. And these automations will do things like:
- Create user profiles (when necessary).
- Send welcome emails
- Add to followup autoresponders or simply just send followup emails
- Send internal notifications (to yourself) if needed, based on what people buy.
- Trigger followup marketing sequences.
- Grant access to material they purchase
You get the idea. A lot of things can be done using marketing automations. You can even set up conditional logic in your automations that will only do certain things based on other tags on their profile. It’s pretty powerful.
The options available to you within these automations can get the juices flowing on ideas and, for some people, cause paralysis because of idea overload. 🙂 So, it is better to just concentrate on the core basics and then you can build more later.
Here’s a few basic automations with some steps to add to them…
PERSON SIGNS UP FOR FREE MEMBERSHIP
- Create user profile.
- Send a welcome email to let them know next steps.
- Add to a followup email sequence to potentially upsell them to a paid membership.
PERSON SIGNS UP FOR PAID MEMBERSHIP (Triggered by addition of permissions tag for the membership)
- Create user profile.
- Send welcome email to let them know next steps.
- Remove free membership tag (if you use one for free memberships)
- Remove from any ongoing email sequences designed to sell them the membership (this way you don’t keep trying to sell them something they already bought)
- Add to new member onboarding
PERSON CANCELS RECURRING MEMBERSHIP (Triggered by addition of the cancellation tag)
- Remove the permission tag for paying members so they no longer have access.
- Add to free membership (essentially, downgrade them)
- Send them an email to acknowledge cancellation.
- If helpful, send an internal notification email to yourself or a team member for certain things they need to do.
- Add them to a sequence (perhaps with a timed delay so you don’t do it instantly) to attempt to sell them on reactivating their membership.
PERSON BUYS AN INDIVIDUAL PRODUCT
- Create user profile.
- Send them a welcome email.
- Optionally add to any followup email sequences to upsell them to something else.
With this one, if you sell a lot of different products that are similar (such as individual courses), you can use one central sequence for all of them. Then, regardless of which product they buy, they get the same welcome email and the same actions take place. You can just use a common trigger tag to go along with the correct permissions tag. Each product gets it’s own permissions tag, but they all use one common trigger tag for the followup.
PERSONS OPTS IN FOR LEAD MAGNET
Typically, when somebody opts in for a lead magnet, I would think the eventual goal would be for them to buy a product or a membership. So, a basic outline of an automation would be this…
- Send them email which delivers the lead magnet.
- Tag them as a lead for a certain product.
- Add them to a followup sequence which will deliver a series of emails over a few days with the goal of upselling them on the appropriate followup product
Using An Email Sequence Versus An Automation In FluentCRM
When you want to send out a series of emails, you can do it in two different ways within FluentCRM.
- Using an Email Sequence, which is just a pre-written series of emails with time delays between them based on how long it has been since the user was added to that sequence.
- As part of the Automation itself using Custom Emails.
Now, an email sequence is very linear. When you add a person to it, they will just be sent the emails you wrote on the schedule you set without looking at anything else. The only way to stop the sequence is to remove them from it.
With an Automation, you have a lot more flexibility. You can send custom emails as part of an automation and set time delays between them in order to replicate the exact same functionality as an email sequence. However, since it is in an automation, you can do things such as:
- Only send certain emails if certain conditions are true.
- Automatically stop send those emails if they meet a goal of the automation (like a purchase).
- Alter the emails being sent based on tags on their profile, therefore making the emails more personalized
Basically, automations offer way more power and flexibility. Generally speaking, I send my automated emails by way of automations instead of email sequences.
Additional Features You May Want To Build
At this point in the guide, I believe we have covered the core basics of what makes your membership site tick.
But, every membership site is a little different. So, let me briefly cover a few extra things you may have in mind.
Sales Funnels
One of the best ways to increase conversions and average sale amount is to utilize sales funnels. A funnel removes all the clutter and concentrates just on making the sale. Plus, it is usual to have various upsells and/or downsells in the funnel.
By default, WooCommerce doesn’t do that. But, with plugins, it certainly can. 🙂
The one I recommend is CartFlows. It is what I use personally. There are others and you’re welcome to check them out (LaunchFlows is another), but CartFlows is what I use and am most familiar with.
CartFlows works with your page builder to build really nice sales funnels. Instead of the standard “Add to Cart”, then view cart, then proceed to checkout and the normal ecommerce thing, you can create much more streamlined sales funnels.
The sales funnels you build with CartFlows are based on your WooCommerce products, so all of your tag assignments work just the same. But, you can actually make more money with structured funnels rather than a raw shopping cart.
PDF Library And Protected Downloads
It is pretty easy to create a nice library of PDF documents for your members. The short version of it is this:
- Create a custom post type for your library. I usually use Advanced Custom Fields Pro for this, but you can also use something like Custom Post Type UI for this.
- Put PDF files into your Media Library.
- For each of the posts, use PDF Embedder plugin to insert the PDF file. On the frontend, that will display the PDF in embedded fashion.
- Protect each post with WP Fusion tags so only your members can access it.
You can read more on creating a WordPress Document Library here.
Also, WP Fusion has an add-on which can protect actual files in your Media Library based on tags. It is called the Downloads addon. It could prove handy, too. It can be a little wonky in some cases, so even they recommend Download Monitor. Keep in mind, too, that WooCommerce has the ability to protect files that you wish to sell access to.
Custom Fields
Depending on your business, you may have custom fields you want to keep for each member. For instance, I keep fields like website URL, their service credit balance, etc.
FluentCRM has custom fields so you can store things in the CRM. Then, for the user profile side of things, I recommend Advanced Custom Fields. Then, what you can do is use WP Fusion to map the fields together so that your custom fields will remain beautifully synced between both FluentCRM and the corresponding user profile.

Not every field type is matchable. For example, the repeater field within ACF is pretty handy for some purposes, but FluentCRM does not support that kind of field so there’s no way to sync them. However, since you have one-click access to switch between a user’s CRM profile and user profile, it isn’t that hard to get around.
Learning Management Systems
As I mentioned earlier in this guide, you always want to consider what kind of online course features you really need. In some cases, you just don’t need a full LMS.
But, if you do, WP Fusion will work to enable student access to courses when they purchase. WP Fusion works with a bunch of learning management plugins, but the way it works with your LMS can differ depending on which one you are using.
For instance, if you’re using Learndash, you cannot just protect the course the usual way with WP Fusion. You need to actually enroll them in the course. The easiest way to do that is using the “Link With Tag” function of WP Fusion. Essentially, you link the course to a particular tag. If they have that tag, they are enrolled. If they don’t, they’re not enrolled. Simple as that.

That works great for individual course purchases, but what about memberships where they’re supposed to get access to all of the courses (or several) at a time? For that, you can use LearnDash groups to group the courses together, then link that entire group to a tag using the WP Fusion setting.
RELATED: How To Create Online Courses On WordPress Without An LMS Plug-in
Powerful On-Site Marketing To Back Up Your Email Followups
OK, follow me on this one…
The beauty of a membership site is that you know exactly who they are when they are logged in. And with WP Fusion and FluentCRM, that is coupled with all the data you have at your disposal.
If you build marketing automations that are designed to make a sale, you can also make your membership site physically change to back up the message of whatever you may also be emailing them.
It all works on tags. If you enter them into a marketing sequence, you just add a STATUS tag at the beginning and you remove it again when the sequence is over. For the sake of discussion, let’s use the tag STATUS: Lead.
Now, in sections of your site where it makes sense, you can put conditional content in place to show up only when your member has the tag STATUS: Lead.
In our tech stack, the best ways are:
- Using WP Fusion’s integration with Elementor to show page elements (or entire sections) only when they have a certain tag.
- Using Block Visibility plugin to show blocks only when they have the tag.
If you are using the block editor for your content, you can build entire calls to action within your content or sidebar that will only show up when that particular tag is present. You can use Elementor to show calls to action on landing pages, in parts of your theme, or anywhere else based on the tag.
In this way, you can have calls to action on your site that match whatever evergreen sales funnel your member may be receiving at their point in the customer journey.
And if you want to make it even better, use the Login add-on for WP Fusion. Based on tags, you can redirect them to different pages at the moment of login. So, if they have the STATUS: Lead tag, you can redirect them to a one time offer page whereas for everybody else you just send them to the member dashboard as usual.
Final Thoughts And Next Steps
This guide, I believe, has covered all of the basics of building a future-proof, flexible, powerful and digitally sovereign membership site. One you truly own and is not on “rented land”. And one that you can back up and keep as one cohesive package without data being splintered all over the place.
It truly is a powerful membership site setup.
Again, it isn’t the only way to go. And I do indeed work with clients who have chosen other tools. But, this tech stack is what I currently determine to be my favorite. 🙂
If you follow this guide and couple it with a little bit of forethought into adapting it to your unique needs, I think you will find it pretty holistic.
Now, there’s the matter of actually building it.
You can do it yourself. I think you’re capable of it.
Of course, if you’d like me to do it for you, I can certainly do that. I work with membership sites all the time. And this exact toolset is the one I prefer so I’d be happy to help you build it out.
Plus, if I do it for you, we will work together to customize things to your specific needs.

David Risley has been building on the web since 1998 and founded Blog Marketing Academy in 2008. After years helping bloggers and online entrepreneurs grow their businesses, he now runs Concierge — a done-for-you WordPress management service for membership sites and online businesses. He manages hosting infrastructure, handles the technical heavy lifting, and keeps client sites running at peak performance. Click to read his full origin story.