When you are building your list, the entire point is to offer your visitors a targeted solution to a problem they are experiencing. The closer you make that opt-in offer jive with what the prospect is looking for, the higher the likelihood that they will subscribe.
Makes sense, right?
In this post, I’m going to show you how you can have a different opt-in offer for each category (or page) on your site.
It all adds up to more targeted opt-ins to your list.
Why This Will Earn You More Opt-Ins
So, you have a person out there on the internet who is looking for how to do something. They go to Google and they type it in. And – BAM! – they land on one of your blog posts. This blog post hopefully does a good job of helping the person solve their problem.
Now, YOUR goal here is to get this unknown visitor to take the next step – and subscribe to your email list.
The closer you can get your opt-in offer to match the nature (and type of problem) of the blog post they just landed on, the more likely they are to opt in. Combine this with my 7-point checklist for an effective lead magnet, and you can do some interesting things.
You could create a lead magnet uniquely for that single blog post – and doing that would give you the highest likelihood of getting the opt-in if you create a good offer.
But, what about the sidebar opt-in? Most blogs have a sidebar – and most sidebars have an email opt-in. Can you make THAT email opt-in form more targeted to the blog post?
You’re damn right you can. And you do it by having a unique opt-in offer for each category.
How You Do It
First off, if you haven’t already read it, go read my post: The Strategic Way To Define Your Blog Categories. (opens in a new window)
Its OK. I’ll wait. 🙂
..
OK, we good? So, now you should see why you should define your blog categories around the hot buttons of your target market. These are the things which your market is looking for.
Now, if we match up a unique lead magnet to each of those benefit-based categories, you see how this will outperform just having one big global opt-in form like most people do?
The first step to doing this is to map out a lead magnet to each of your major categories. Here’s how I do it for the Blog Marketing Academy…
[one-half-first]Category
Get More Traffic
Sell More Stuff
Build My Platform
Increase Enagagement
Build My Business
Be More Productive
[/one-half-first][one-half]Opt-In Offer
Post-Publish Checklist
Product Idea Generator
30 Wordpress Plug-ins Ebook
Pre-Publish Checklist
Academy Business System
(currently pending)[/one-half]
As of this writing, I haven’t gotten one set up for the “Be More Productive” category, but all the others have been matched up with a lead magnet which is more likely to be relevant to people finding value in the posts within that category.
Once you have the lead magnets created, then you have to create the opt-in form and distribution for each one. Personally, I am using the LeadBoxes feature of LeadPages to create the actual opt-ins. It works quite well and it allows me to track the stats of each lead magnet from a single screen – which is quite convenient. 🙂
For the actual forms, I simply use a text widget in my sidebar and I place the design and opt-in code into that widget.
Now, here’s where you set up the separate box for each category…
First, make sure you gave the Wordpress Jetpack plug-in installed. It is free. Then, you want to have the Widget Visibility module enabled. That module will give each widget the ability to give it conditional rules on when it will appear and not appear. This is the key.
I then create a “catch all” opt-in form using a widget. Then, for the categories I intend to have a more targeted lead magnet, I set up rules to HIDE the catch-all from those categories.
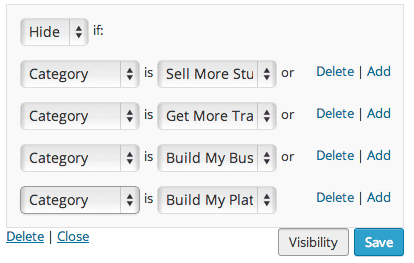
Then, for each targeted lead magnet, I drag in a NEW text widget into the same sidebar. Set it up the same way, but I add a visibility rule to SHOW if the category is the one I want to target. It looks like this:

So, it is a little bit of logic here. If for example, the category of the blog post is “Get More Traffic”, then the catch-all opt-in will be hidden and the targeted one will appear.
The one thing to keep in mind here is that this setup will make you NOT want to assign your posts to more than one category, because you could end up having multiple opt-in forms showing in your sidebar. Just keep that in mind. 🙂
Expanding On This Idea
The cool thing about this concept is that it does not require that you spend any money. Jetpack is free, and there is nothing stopping you from setting up every other aspect of this for free.
Like I said, I use LeadPages for the Leadbox feature, because I find it cleaner than a typical opt-in form.
You could also do the same thing by defining different sidebars for each category. Either way, that would be more work. If you don’t use a framework of some kind, then you’d have to manually code it. Or you could use Genesis and the Genesis Simple Sidebars plug-in, but then you’d need to select the sidebar for every post you publish. More work for you. Using Jetpack works nicely.
If you wanted to do the same thing but for the END of your blog post (rather than your sidebar), then I’d recommend you check out Magic Action Box.
Lastly, two blog posts you might want to check out for further information on building your list:
- The Mechanics Of Email List Giveaways – How Do You Set It Up?
- The Essential Guide To How To Build Your Email List [The List Building Equation]
 And lastly, to get some more fine-tuned and thorough help with building your list – and what to do with your list after they’ve subscribed – then check out the Academy course called Master Your List. I think you’ll find it valuable. 🙂
Got A Question? Need Some Assistance?
Have a question about this article? Need some help with this topic (or anything else)? Send it in and I’ll get back to you personally. If you’re OK with it, I might even use it as the basis of future content so I can make this site most useful.