How To Create 2-Step Opt-ins In Your Blog Posts Using Thrive Leads
I recently set up a 2-step optin on one of my blog posts which is converting at 11%. Here’s exactly how to set it up.

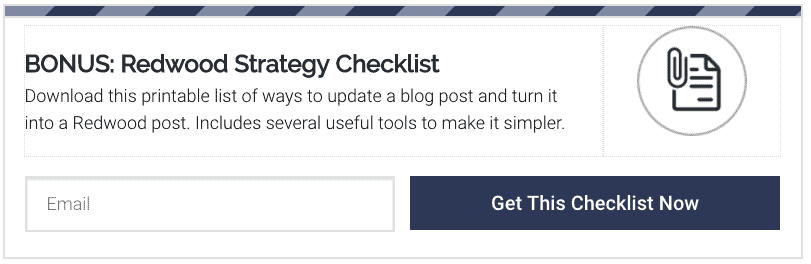
In one of my recent posts where I talked about The Redwood Strategy, I included a content upgrade that people can opt-in for. But, I set it up as a two-step opt-in.
The result after only a few days is that the post is getting a 11.07% conversion rate.
These kinds of opt-in forms usually convert better because it is more intent-driven. When people see an email opt-in upfront, it feels like more of a “take”. People don’t tend to act as readily on them. But, if all they see there is a button, it is seen more as a “get” than a “take”. But, by the time they’ve clicked on it, they’ve decided they do actually want it. Therefore the actual conversion rate on the opt-in will be higher.
Now, the day after I published that post, I had one of my Lab members inside the Lab Community Forums ask me how I built that. She has a copy of Thrive Leads, but was still wondering if I had custom coded that opt-in form.
The answer is…. nope. No custom coding required.
It is super easy to do using the Thrive Leads plug-in, but perhaps it isn’t super clear the capability is there.
Here’s a quick rundown on how to do it…
Thrive Leads has what is called “states”.

These states reflect different versions of the same form. The Default State is the version of the form people will see when the page first loads up. Then, you can pull up the other states based on actions the person takes.
So, let’s look at my Default State…
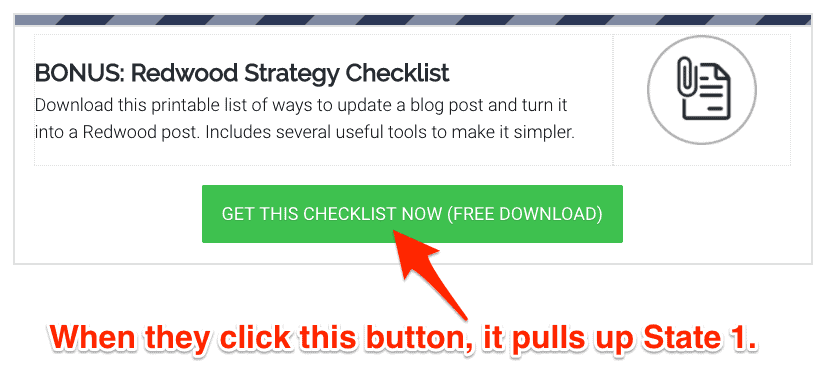
State one then looks like this…
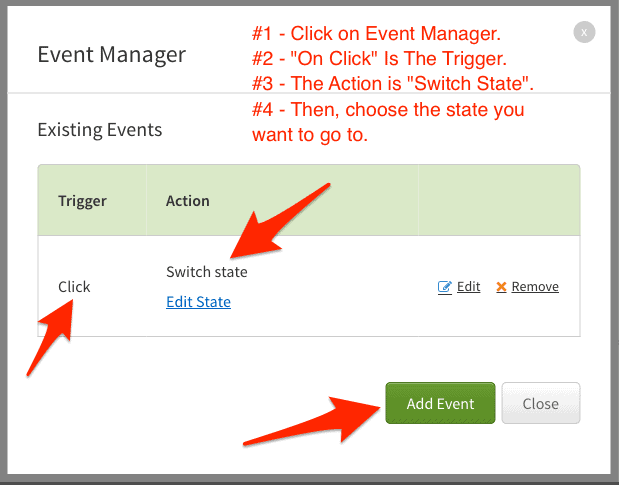
Now, on that button in the default state, you pull up the “Event Manager”. You’re going to create an event which triggers when they click the button. The action performed will be to switch state to state 1.
That’s about all there is to it.
By using States inside of Thrive Leads, you can create multi-step forms anyplace you like on your site. You can even create forms where the person can choose what they’re most interested in, then pull up a different state depending on their choice. One form can then offer different lead magnets. That’s email segmentation on steroids!
I am a HUGE fan of the Thrive Themes suite of tools. I think it is the biggest “bang for your buck” toolset available for any online business which uses Wordpress.
I highly recommend the Thrive Suite to access all of their tools, but what I’ve shown you here is just a section of Thrive Leads. For this – and many other reasons – this is why Thrive Leads is most definitely the opt-in plug-in I recommend for all of my readers using Wordpress.
I’ve tried the major contenders out there and just don’t like them as much.

David Risley has been building on the web since 1998 and founded Blog Marketing Academy in 2008. After years helping bloggers and online entrepreneurs grow their businesses, he now runs Concierge — a done-for-you WordPress management service for membership sites and online businesses. He manages hosting infrastructure, handles the technical heavy lifting, and keeps client sites running at peak performance. Click to read his full origin story.