When you spend a fair amount of time crafting that blog post, you want it to count. You want people to read it. You want people to share it. You want to get some traffic from it.
Unfortunately, that doesn’t always happen.
There are certain things you can do with every blog post you write in order to increase it’s potential for effectiveness.
In truth, there is no such thing as perfection. The idea of a “perfect” blog post doesn’t exist. However, there is both art and science behind an optimized blog post. The art comes down to how good of a writer you are, your topic, etc. The science, however, comes down to proven best practices.
In this guide, we’ll cover those best practices.
In This Post…
The Headline
The blog post headline is most definitely #1. It is the make/break point on whether a majority of people will read your post. According to CopyBlogger:
On average, 8 out of 10 people will read headline copy, but only 2 out of 10 will read the rest.
Most people on the Internet are borderline hypnotic. The constant inflow of content just renders them damn near comatose. Your blog post is just one of likely hundreds hitting them at any given time. Your’s must stand out and smack ’em in the eyeballs in order to get noticed.
But, it gets even worse…
As we’ll discuss further down, people aren’t really reading your blog posts. They’re scanning them. And, this goes for the headlines, too.
What?! People aren’t even reading your entire headline?! Well, that’s what the data shows. According to KissMetrics, readers tend to absorb the first three words of a headline and the last three words.
That’s a bit of a buzzkill, huh? But, we have to work with human nature, not against it. Plus, it isn’t as if you have to have a 6-word headline. In fact, the headlines most often shared on Twitter have 8 to 12 words (according to Hubspot). So, what we want to do is craft a headline that does the job, but emphasizes those first few words and last few words.
The mistake I find most people do with their headlines is just state the topic and leave it. Or they’ll give it some cutesy title that gives zero clue what the post is about. I remember one time looking at a photography blog where the lady had written a blog post about lighting. The title: “Video Lighting”. This is headline fail.
Your headline should contain:
- An inherent promise of something they’ll get. It should hold a promise of being useful toward a specific outcome they want.
- Specifics. Numbers work well. Just don’t be vague.
- Intrigue or curiosity. Can you make them wonder what you’re about to tell them? Curiosity is the what drives clickbait. It is why we call it “bait”. 🙂
For all you’d ever want to know about crafting awesome blog post headlines, read: 58+ Headline Formulas: The Ultimate Non-Copywriter’s Guide To Writing Headlines That Get The Clicks.
The Feature Image

The feature image is that graphic image which usually shows up right at the top of the post. Most importantly, it is what will show up when the post is shared on social media. This why the image is important.
Many bloggers don’t use feature images at all. That could be fine if you’re just doing an informal journal-style blog for fun. However, if you like traffic, you should do a feature image. It takes a bit of extra time, but it is worth it.
There’s 2 things to consider here…
Featured Image Dimensions
Technically, you can have a feature image of any size you want when it comes to presenting it on your blog. However, the real importance of the image is due to social networks. And each social network has their own ideal dimensions.
As of this writing, these are the preferred dimensions for each of the major social networks:
- Facebook – 1,200 x 628
- Twitter –1024 x 512 (displays in timeline at 506 x 253)
- Instagram – 1,080 x 1,080
- LinkedIn –1200 x 630
- Pinterest – 600 x 900
- Google+ – 506 wide
Now, you might be thinking this is just impossible. The good news, though, is that all these networks will auto-resize the image as needed in order to fit their network. You just want to make sure the aspect ratio (the ratio between the horizontal and vertical) is such that it can resize properly.
To simply, it basically comes down to 2 layouts:
- Horizontal – 1024 x 512
- Portrait – 800 x 1200
Almost all of the networks will take your horizontal image and resize as needed. The portrait layout is primarily for Pinterest. There’s probably no need to bother making a portrait image for your post unless it is the kind of material likely to do well on Pinterest.
Featured Image Content
What goes in the image?
Well, don’t bother getting too literal about it. You can keep it rather conceptual. You want it to be attractive, although I know that can be a matter of opinion. Here’s a few things to keep in mind:
- Don’t put a lot of words on the image. Ideally, none. It will clutter things up when shared on social. Keep in mind that the image is going to appear alongside the headline, so it isn’t as if the feature image has to do the heavy lifting.
- Consider the colors. Bright colors tend to attract the eye. If your image shows up on the Twitter timeline or the Facebook Newsfeed, is it likely to pop off the page? For instance, a feature image which is “Facebook blue” might blend in.
I’m personally a use fan of Deposit Photos. This is where I get most of the images I use for features.

Whatever your source, make sure you have the legal right to use it. If you just go use Google Images, chances are any image you find won’t be legal to use.
The Hook
The headline gets them in the door. The hook draws them in further.
In terms of our blog post, the hook is that text right at the beginning of the blog post. Aside from the headline, it is the part of the post most likely to be read. And it can make a major difference on whether the reader will stick around to read the post or not.
What you don’t want to do is apply what you learned in school. 🙂 This isn’t about stating your “main idea”, then the rest of the post is supporting paragraphs. That’s too formulaic and too boring. In the real world, we need to apply a bit of psychology to the hook so people will actually read.
One of the most powerful forms of hook is the story. Some short story with a little mini-plot to it. Alex Turnball, from GrooveHQ, ran a split test on this and wrote it up on Buffer. The post in question was a reference post, similar to what I usually write here at the Academy. But, one version started off with a short story and the other didn’t. The result…
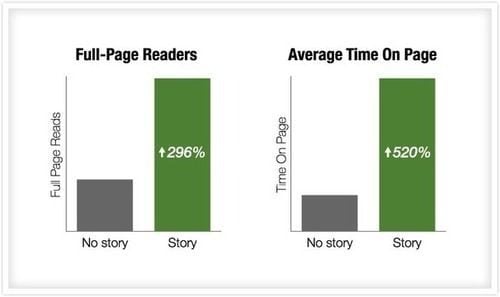
A massive jump in average time on page as well as scroll depth (both of which are awesome for SEO).
This kind of hook takes some practice. You want to make it interesting and work in some emotion. But, it will make your blog post much more effective.
There are other types of hooks besides the story. Michelle Pollack has 10 examples of how to open a blog post with a bang.
The Link Strategy
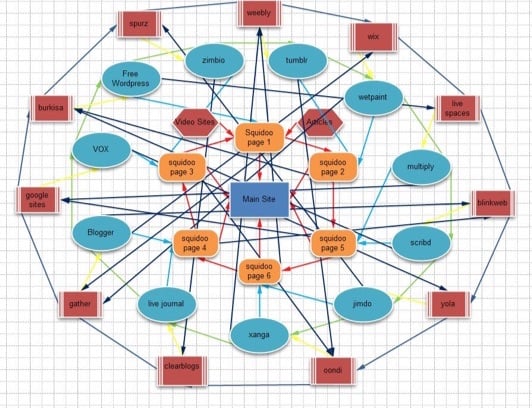
For a post to operate at full effectiveness, it has to not be an island unto itself. You want to include both internal and outbound links.
There is no perfect ratio between internal vs external links. Just keep it natural.
Outbound Links
A good, useful blog post will almost naturally contains links to other, relevant blog posts on other websites. A great way to add a lot of credibility to your post is to include statistics and, of course, link to the source of those statistics.
Linking out to authoritative sites which are relevant to your post is a positive signal for SEO. Reboot did an experiment on how linking strategy affects SEO and concluded:
The main thing to take away from this test is that although we don’t know and have not proved how powerful outgoing links are in the grand scheme of things, we have proved they do have a positive impact if used correctly.
More importantly, we disproved the old myth of Pagerank retention which in my opinion has done nothing but harm to the internet as a whole as webmasters try to keep the ‘link juice’ in house slowly eroding the building blocks of the web.
That last part is important because I’ve seen many bloggers who get concerned about linking to other sites because they want to preserve their “link juice”. Ignore all that. Linking to high-quality content is a positive signal to search engines of what your blog post is about.
Outbound links can also be a great form of blogger relations. Many times the receiving blog will get the “ping” and the blogger will see you linked to them. It can help spread the word.
One suggestion is to have all external links set to open up in a new window. This way if your reader clicks on it, they don’t simply leave your site.
Internal Links
Internal links are linking to your own content when relevant. You definitely want to do this.
Don’t link to top-level core pages like your homepage or contact page. That’s a waste of time. What you want to do is deep linking where you are linking to other blog posts, perhaps deep in your archives.
Link to relevant blog posts in your archives. With Wordpress’s newest link creator in the post editor, you don’t need to memorize or manually get the post URLs. Simply plug in your keyword and run a search and select the post you want to link to.

As much as we’d all love a “perfect” number of internal links to use, there is none. Just keep it reasonable and natural. When it makes sense to link to another blog post, do it.
In terms of which blog posts to link to, you’d want to choose the ones most optimized. When you link to another post, you are passing authority to it. It obviously makes sense to pass that authority to posts which are worthy of it.
Lastly, you obviously will need to include links to calls to action. This is something we’ll discuss below.
The Sub-Headlines
Most people will never read your blog post. They’ll scan it.
They’ll scan the headline. They might read some of your hook. They’ll scroll down and scan. They’ll only see what jumps out at them visually. This means, they’ll see images. They’ll see other things we’ll discuss in this article. But, they’ll see sub-headlines.
Sub-headlines serve the same function as the main headline: To get their attention and make them want to read. However, while the main headline makes or breaks the whole post, your sub-headine’s job is to get them to want to read what’s under it.
It is always very annoying when you see a blog post which is just a long passage of text with nothing to break it up. All that work they did to write it and, more than likely, very few people will actually read it.
So, definitely use sub-headlines to break up the flow and to break it up into sections. It isn’t so much about organization in all cases. It is about giving readers an anchor point. It gives them a new start with an extra push to keep on reading.
As you use them, consider these points:
- Your main headline should be Heading 1. Make your sub-headlines H2 or, if using “sub sub headlines”, you can use H3.
- While SEO keywords are a factor in the sub-headlines, the overall reader flow is more important. So, write for people. Write it to hold their attention and make them want to keep reading. That’s more important than keywords.
- Scan the sub-headlines as you go down and see if they tell the story of the post on their own. The reader should get the idea of the contents just by scanning sub-headlines.
- Always make sure your theme is set to give sub-headlines a much larger font than the surrounding text. They must stand out. Do not simply use bold text.
- The same rules that apply to headlines apply to sub-headlines. Make them interesting, intriguing. Don’t just use labels. Don’t give away the farm and tell them everything in the subheading. Remember, just like a headline, the subheading’s job is to cause them to keep reading.
My suggestion is usually to write your post first. Then, go back and devise subheadings after the fact.
The Images

Articles with images work better. In fact, according to Jeff Bullas, articles with images get 94% more views than articles without.
It makes sense, too. It is always a much nicer reader experience to read a post with compelling images than a long post with nothing but text. Nobody likes reading the phonebook.
Now, this doesn’t mean you just go out and insert images for the hell of it. Don’t go out and get generic stock photos and litter up your post with them. The mere presence of images doesn’t simply check this box. You’ve got to put some thought into it.
- Photos with people do well. But, it has to be a compelling image. Not some boring stock photo. We all know the kind. 🙂
- Using images to SHOW what you’re talking about is always ideal. If you’re giving steps, show the steps. If you’re giving a stat, show a diagram of that stat.
In terms of how many images you should use, BlogPros did a study of 100 high-ranking blog posts. They found found the average length to be 1,149 words and 3.2 images. That’s one image per 360 words.
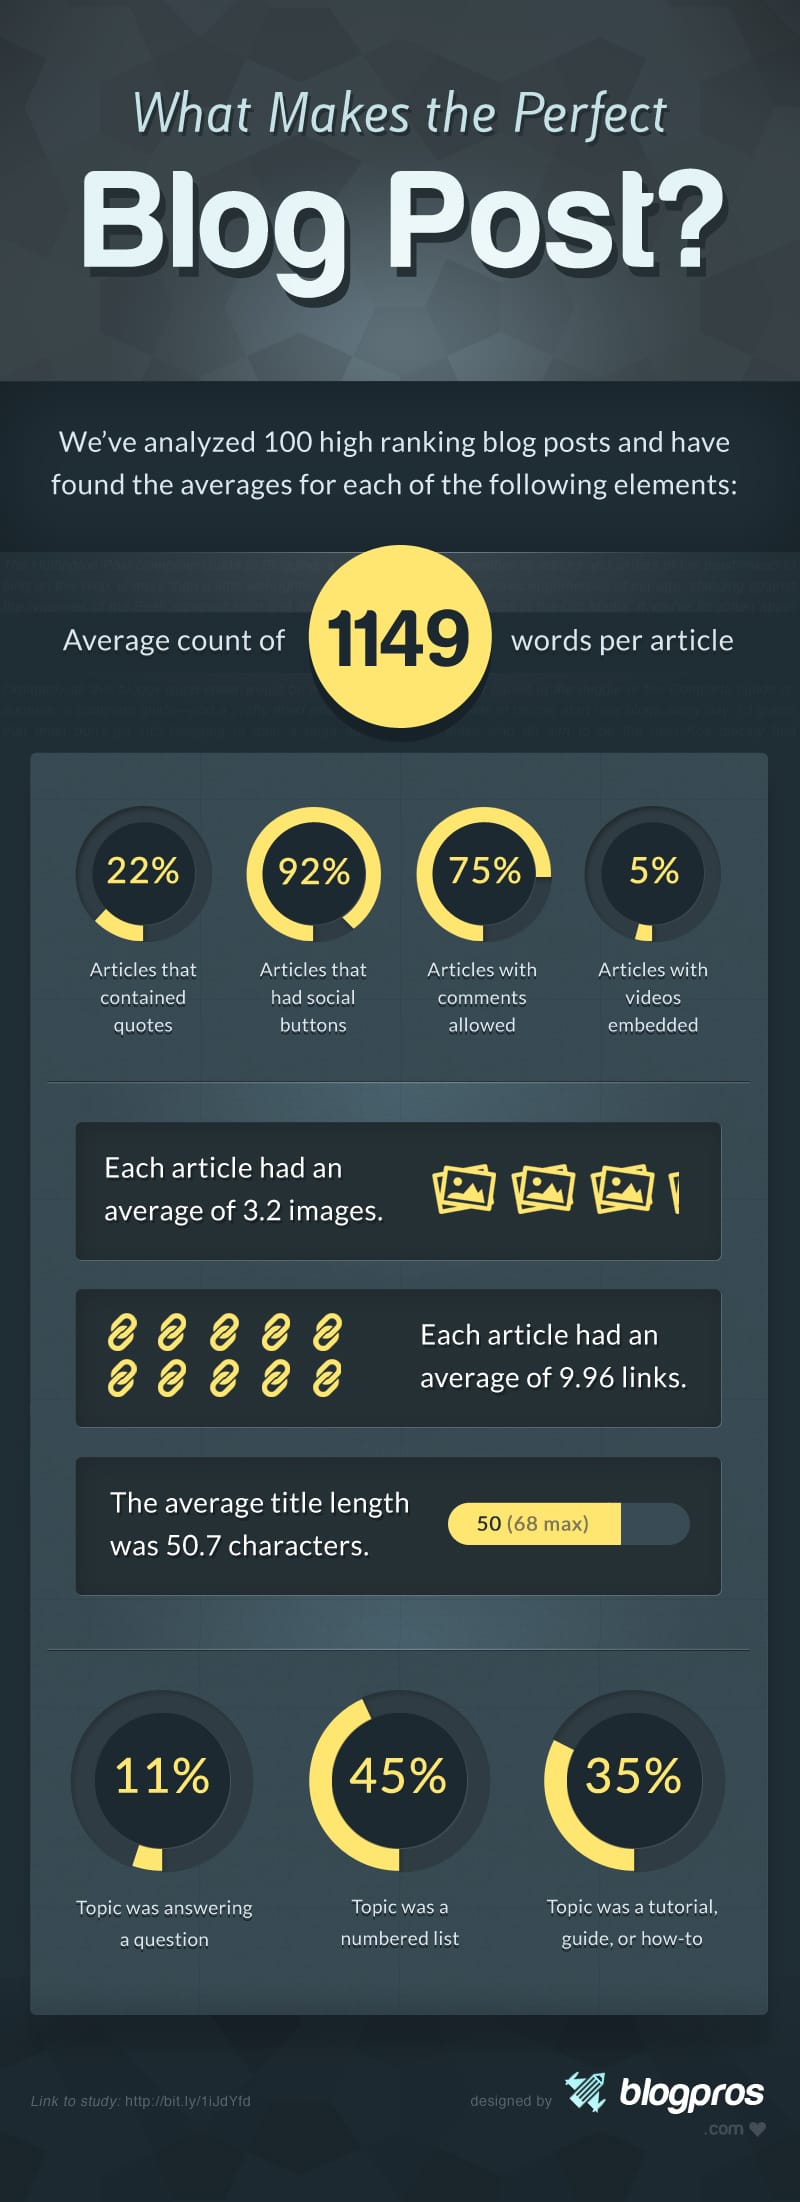
Now, you don’t have to get that specific with it, but it gives you an idea. Chances are, you should be using more images in your post than you are now.
If you can make your own graphics, that’s preferred. You can take it with your own camera. If it’s a diagram, you could use something like LucidChart to design it. For statistical graphs, I’ve even plugged data into a spreadsheet, made a chart, then snapped a screenshot. HubSpot has some tips on how to make great charts with Excel for your content.
Lastly, there are a few mechanics to keep in mind on your use of images:
- Before you upload an image to your media library, rename the filename so that it contains keywords for what’s in the image.
- Optimize the image to reduce the file size. Slow load time is an absolute traffic killer, so you want those images to load up lickety-split. Optimize your images.
- Use the ALT tag when inserting the image. Don’t keyword stuff it. Just type out what’s in the image. Pretend you’re making it make sense to a blind person.
- If it is a custom image you made ourself, consider adding a watermark. This way if the image shows up somewhere by itself (or another blogger uses it), it is still branded to you.
The Content
I’m obviously going to leave the guts of your content up to you. The “perfect” blog post would obviously be compelling, relevant, useful and/or entertaining.
There are, however, certain mechanics to keep an eye on when it comes to your content that will serve you well.
We’ve already talked about headlines, subheadings, and images for your post. These are all part of your content. But, the “guts” of the post matter, too.
The Perfect Post Length
Short little blog posts tend not to go very viral. At least unless you’re name is Seth Godin.
According to the Data Lab at Medium in a 2013 post, the optimal blog post takes 7 minutes to read.
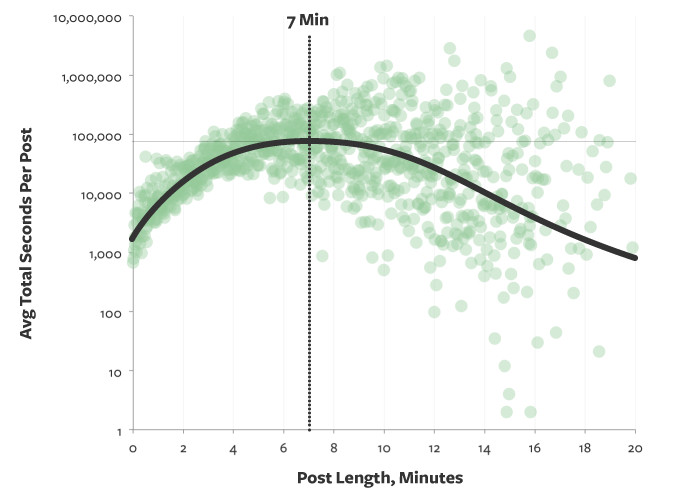
This works out to roughly 1600 words. Now obviously nothing is set in stone. In fact, Rand Fishkin from Moz.com calls the idea of a “perfect” post length total bulls**t.
I tend to lean more toward Rand, personally. However, my posts tend to be long ones. My thought is this…
Those times when I’ve personally felt most compelled to share a blog post on social media, it is because I was truly impressed by the value given. In the words of Chris Ducker, it was a value bomb. 🙂 I wanted to share it to make myself look good, to reward the author, etc. So, flipping this on it’s head, I think the way to inspire people to share your post is to “wow” them with the amount of value. Typically, that’s a longer post.
Plus, if you apply The Redwood Strategy, then you’ll create longer, value-rich posts and less crap.
The Perfect Blog Post Format
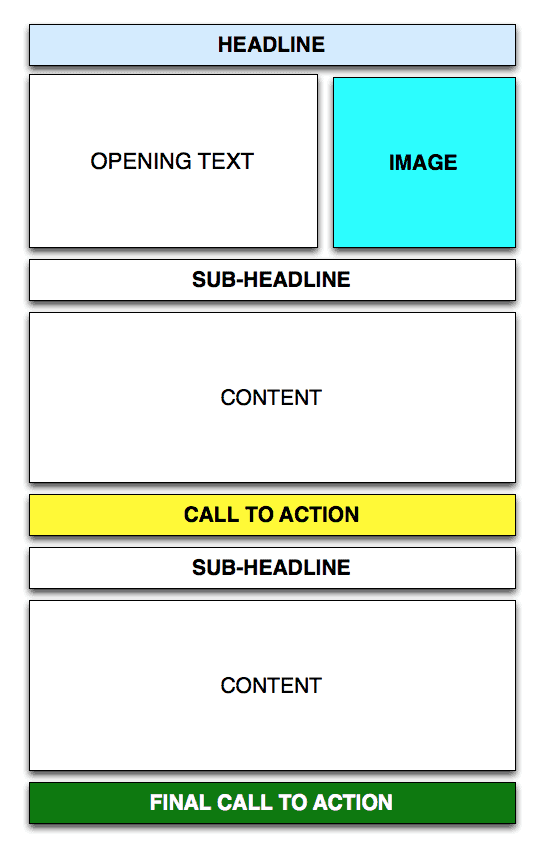
Every blog post is going to be different, but there are certain best practices to bear in mind to get closer to “perfect”.
- Ensure all lists (or anything which fits better into a list) is bulleted or numbered. Bulleted/numbered lists stand out to people who are scanning the post rather than reading it.
- If you quote somebody or part of another blog post, use a blockquote so that it stands out.
- Make key text of the post stand out by using bold text, highlights, etc.
- Ensure the text is left-aligned and not justified. There’s nothing harder to read than a big honker block of text that is justified.
- Do not – I repeat do NOT – use long paragraphs. I don’t care what you were taught in school or what you see in books. On a blog, use short paragraphs.
The Viral Coefficient
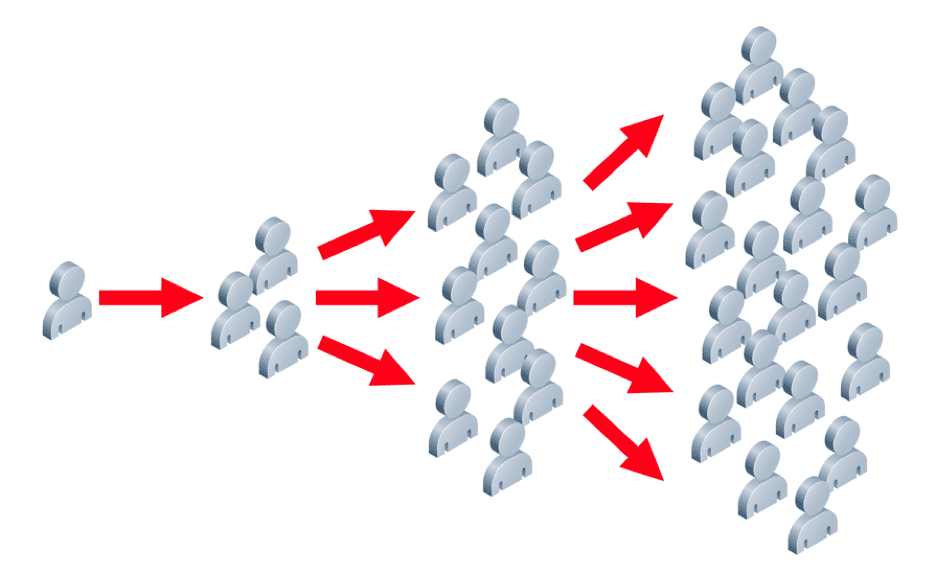
Your blog post is going to get some kind of traffic on it’s own. It could be from your own audience, from search, your email list, etc. But, the name of the game is to get those people to bring new people. This is how your post will increase the size of your business.
This means you need to increase the viral coefficient. It is defined by Geckoboard as:
Viral Coefficient is the number of new users an existing user generates. This metric calculates the exponential referral cycle – sometimes called virality – that accelerates company growth. Virality is the inherent incentive for customers to refer friends or colleagues to your company.
It is pretty simple, really. If you get 10 leads and one of those people refers a friend, then you’re getting a 10% viral lift, or a viral coefficient of 0.1. Now, since we’re talking about a blog post here, we’re talking about web traffic not email subscribers. The principle, though, is the same.
Simply put, we want to put everything in place in order to raise our viral coefficient. Not only to make it easy to refer new people, but entice people to do so.
How can we do that?
My favorite method is to use a “tweetable”. This is simply a highlighted quote from the article which is suitable for a tweet. Next to it is a button that invites a retweet of that quote. That tweet obviously includes a link back to the post.
I use Social Warfare to get this done.
The other thing that I like about the tweetable is that it sets that quote aside visually. It is a form of highlighting key content and it stands out to people scanning the post. It is a way of killing two birds with one stone, so to speak.
Some other ways to increase your post virality would be:
- Creating an infographic to go along with the post. Very popular for sharing on Pinterest.
- Running a contest of some kind on the post where one of the conditions to enter is to share the post.
- Using Thrive Comments for your comments which then allows you to present a call to action to all commenters. You could ask them to share it.
- Present a content upgrade where they share the post to unlock access.
Of course, doing these things is no guarantee your post will go viral. All you’re doing is setting the stage so that it could happen. Underlying all of this is the obvious need that your content be something that inspires people to share to begin with.
The Call To Action / Opt-In
Every blog post should have a reason to exist that goes beyond somebody simply reading it. Since the Blog Marketing Academy is really all about using the power of blogging to propel your business, then that’s what we intend to do. Every blog post should, ultimately, be a marketing asset.
The goal of your blog post should be to provide immense value and solve a problem for them. And THEN… move them to take further action. You want to move them up the custom awareness scale.
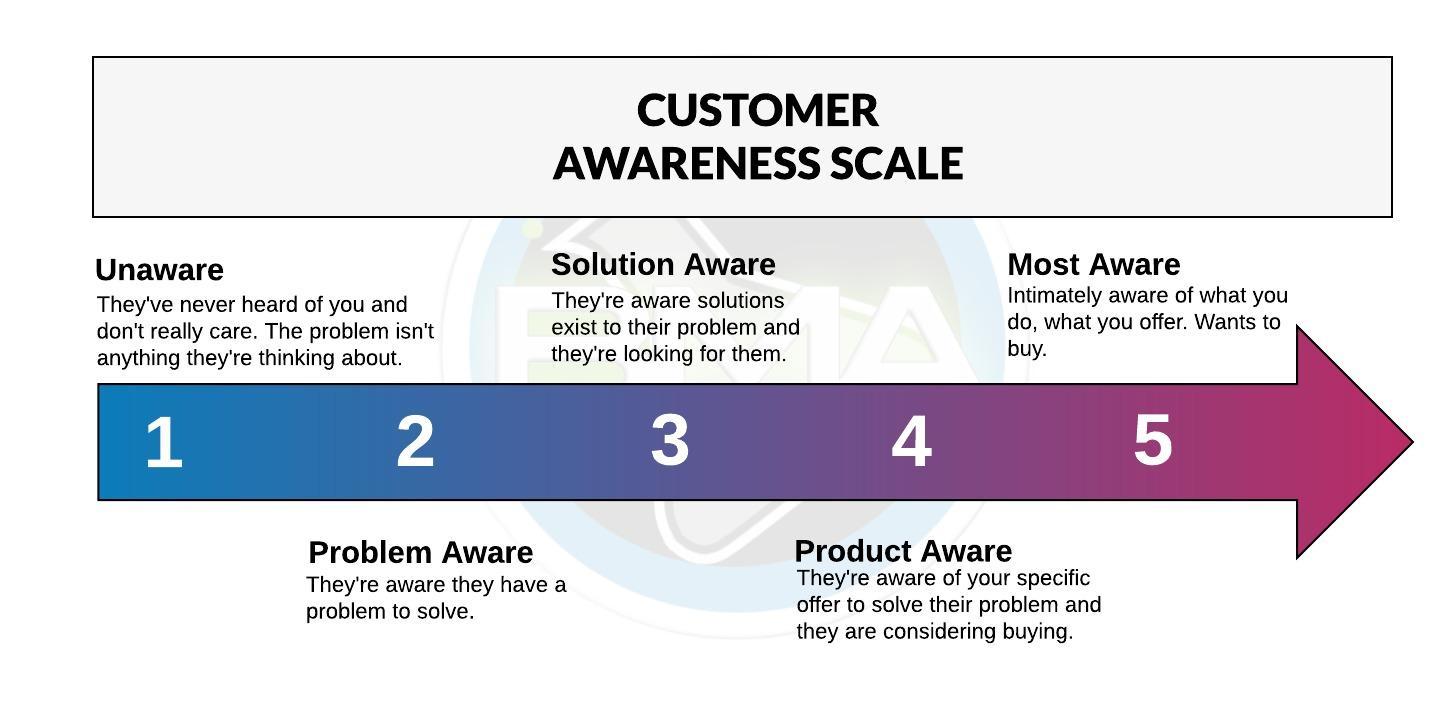
Your big blog post is designed to attract new people (unaware). By the time they’ve read the post, they are hopefully problem aware. Very likely, they will have been problem aware already, but not they aware of YOU, too.
The next step in the marketing cycle is to make them solution aware. Not only that solutions exist, but that YOU provide them. The next level of connection is to get them to opt into your email list for a related lead magnet. Could be a PDF, a webinar, a video, whatever.
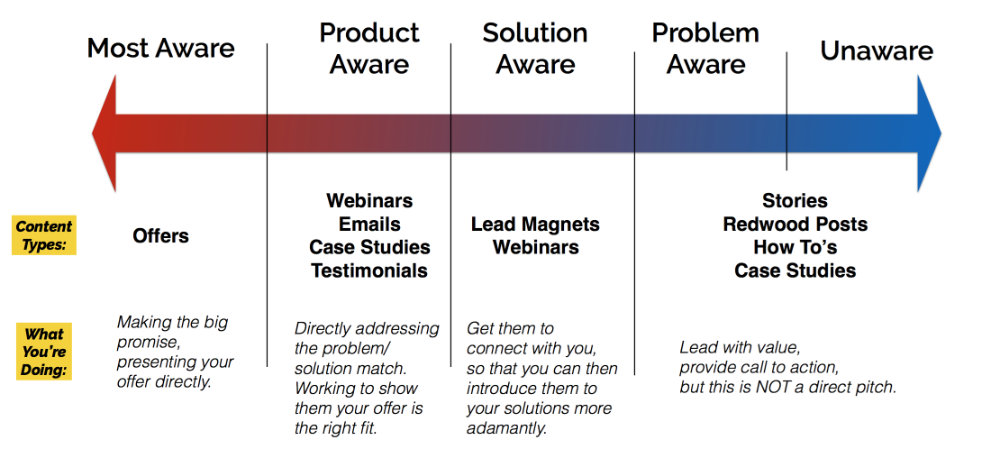
This is what your blog post is ultimately doing. So, no blog post should be without a call to action. Perhaps even more than one.
By far, the most effective call to action I’ve seen in a blog post is the content upgrade. Create a complementary free download specifically for your blog post and offer it as a lead magnet. Then, insert the opt-in directly into your blog post.
Thrive Leads is, in my opinion, the best solution to do this with Wordpress. You can insert opt-in forms that fit the look of your blog content. You can either create 2-step opt-ins triggered by a link, or you can create buttons which trigger a popup, or you can insert a full form if you want.
You can insert multiple calls to action into the same blog post if it is suitable. Longer posts have the room for it. The primary thing is that any CTA you use has to be highly relevant to what’s being discussed in the blog post.
You also want to consider the marketing purpose and target audience of the post. For instance, you can use a blog post as a sales page to sell a product. But, you’d likely want that post to go to a very qualified, warm audience. Perhaps your own email list. If, however, this post is primarily designed to bring in NEW people, then your main goal should be to gain the opt-in rather than go directly to a sale. You can link to your products, of course. Some people may be ready to buy immediately.
Once the reader is on your list, they enter your sales funnel. This is how a blog fuels a business.
How To Find The Time To Do All This
This post provides the mechanics of the “perfect” blog post. The whole idea is to craft a post which structurally is set up to perform as well as possible.
Now, this may seem like alot to do. It may seem impossible.
And surely, if you are in a habit of posting very frequently to your blog, then doing all this every time may be impossible. If you post every day, you’re unlikely to create a unique content upgrade every time. You may not take the time to create a vertical feature image for Pinterest. You may not have the time to write a post which is 1600 words or longer.
I get it. Do what you can. The more things you get right, the stronger your post can perform. But…
You may also want to question your blogging strategy. Do you actually need to post that often?
I’ve seen many, many business owners who dismiss blogging as too “high maintenance”. But, they do so because they believe they have to post to it often otherwise the blog dies. That simply IS NOT TRUE.
I am a firm practitioner of the Redwood Strategy. I believe in quality over quantity.
I also believe that we have a business to run. A life. We don’t live to blog. Our blog is supposed to serve us.
So, perhaps slow your blogging down to the point where you can do most (if not all) of this every time, for every post. Build posts that can serve as long-term marketing assets rather than a fly-by-night momentary hit that quickly disappears into your archives.
Your blog isn’t really the best place for ongoing relationship with your audience anyway. Your email list is.
Got A Question? Need Some Assistance?
Have a question about this article? Need some help with this topic (or anything else)? Send it in and I’ll get back to you personally. If you’re OK with it, I might even use it as the basis of future content so I can make this site most useful.


