Switching To FluentCRM: Here’s The Process I Used To Switch From Drip
It was something I didn’t look forward to, but I finally got it done. I migrated from Drip to FluentCRM. Here’s how it worked out…

Switching email list hosts is never particularly fun. And that’s especially true when it is a marketing automation platform.
At the core, you’re exporting your list from one and importing into the other. But, that does nothing to keep everything else intact. This includes automations, tags, rules, templates, etc.
It has long been on my agenda to switch to FluentCRM. I’ve talked about doing it before. And as I watched the platform mature, I realized it was ready for me.
In this post, I simply want to document what it was like migrating my email list to FluentCRM. In my case, the whole membership works based on the CRM database (and I use WP Fusion to make everything work). So, it was indeed a multi-step process to make this switch.
Installation And Initial Setup
The easy part is simply installing FluentCRM to Wordpress. You first install the main FluentCRM plug-in (the free version) and then you install and activate the PRO add-on to get a lot of the goodies.
You’ll go through a short setup wizard, entering your business name, address and logo. You’ll also need to set up at least one list and one tag. I just called my list “Main” and set up a tag called “Member”.
I also set up FluentSMTP and set up my site with Amazon SES. While one can use any external email service, Amazon SES is solid and also the most affordable. Literally, you could send 100,000 emails and it would only cost you $10.
Setting up with Amazon SES isn’t a trivial task. The Amazon interface isn’t user-friendly and it requires several fairly technical steps to do it. FluentCRM has it all documented. I’ve done it a few times now and it gets faster every time I do it. Also, the good news is, once it is done, it’s done forever. 🙂
Once things are set up, you’ve got a pretty empty setup of FluentCRM. You’re perfectly safe to play around here as your old CRM (Drip, in my case) is still operational. So, in my case, I decided to start the prep work first before I begin looking at moving my email list.
Setting Up Email Templates
I have gotten pretty used to the email editor in Drip. FluentCRM uses the block editor from Wordpress. It is a pretty different experience.
One of the first things I did, then, was to set up some basic email templates that I could use across the system. The reason is because I wanted to make sure emails sent from FluentCRM would look OK.
My normal emails are pretty basic. A logo at the top, body text, and a short footer. That part is super easy.
THE EDGE has a lot more to it, so it took some time to set up a template for it. There are indeed some visual differences from the version I was sending from Drip, but I just have to accept that. If I want to use the block editor, I have to work within those confines. Otherwise, I have to custom code a template and I didn’t feel like it. 🙂

So, I took a little time to create these templates to make creating emails a little easier. As of this writing, FluentCRM does not have any way to easily turn an email into a template, so you need to specifically create the template in the Email Templates section.
This is one thing to keep in mind when transitioning from something like Drip to FluentCRM.
There are no fancy email templates built-in like many hosted solutions have. The block editor has less options. Without some legwork, FluentCRM is better suited to simpler emails. It will support fancier ones, but they’re just harder to make.
If you want to use fancier emails than the block editor can easily do, you might want to consider using an external email editor like Stipo.
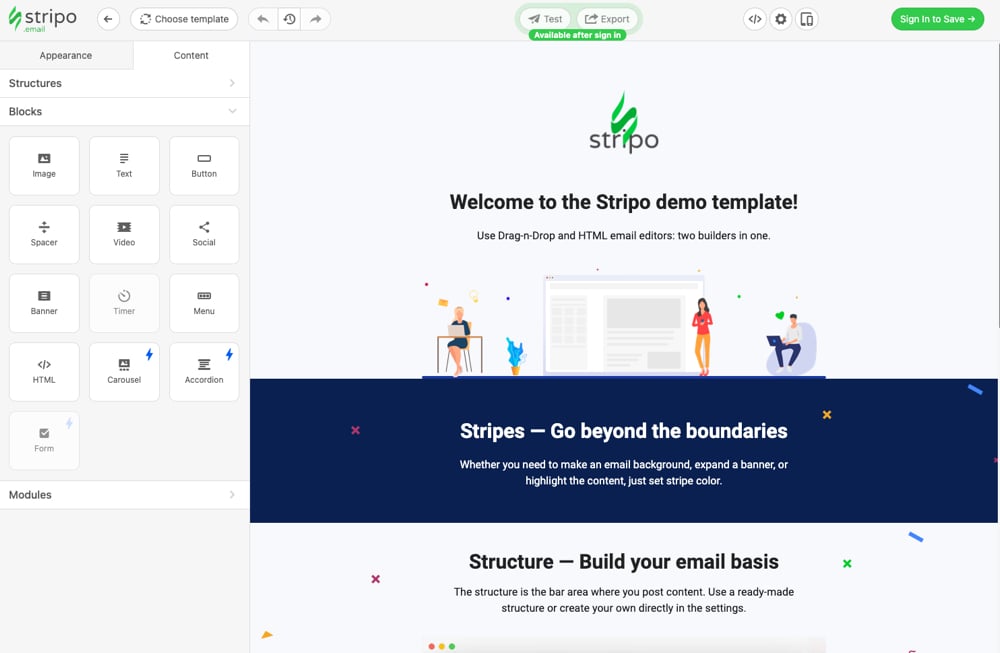
You can design fancy emails using Stripo then just copy/paste the HTML right into FluentCRM to send to your list.
For me, I’m just going to stick with FluentCRM’s block editor. THE EDGE is the most visual email I send, but most emails I send are quite simple. And I like it that way. 🙂
Setting Up Tags
I have a big list of tags in Drip. Truth is, not all of them needed to be brought over to FluentCRM because they were for things I no longer do or offer.
The tags I DO need, though, need to be brought over to FluentCRM.
As I begin this process, FluentCRM just updated to version 2.2. It would certainly be convenient if it had the ability to add tags to the system in bulk, but it does not. So, I had to add each of my tags to FluentCRM one by one.
It is a process of copy/paste.
Some tags I simply choose not to worry about. Other tags I have decided to rename for the sake of internal simplicity. Anybody who has been using a marketing automation tool for awhile knows how you can get quite the list of tags with oddball names. 🙂 I might as well take this opportunity of switching tools to clean up the mess.
The big thing to keep in mind here is that there is no need to name your tags exactly like the original CRM. This is because FluentCRM currently doesn’t import user tags as part of the CSV file. Instead, you choose which tag to assign to imported leads at the time of import. This means I will need to do multiple exports and imports to get the leads into the system properly (which you’ll see below). But, it means I can rename tags if I so choose.

I created several tags all at once that I knew I was going to need. Some I created as I began to work on automations so that I could use them as triggers. More on that in a bit.
Overall, I’m certainly going to have far fewer tags in FluentCRM than I did on Drip. Which is a good thing. Feels like doing a spring cleaning! 😉
Setting Up Lists
Coming from Drip, the idea of having multiple lists was certainly a change. Many other CRMs have multi-list capability, but the way Drip works is just one big list and you use segmentation on it.
By default, FluentCRM makes you have at least one list. And I initially just created “Main” with the plan of having only one list.
As I began working on the setup, however, I realized there would be a certain convenience to actually using the multi-list capability. It is just another form of segmentation (like tags).
When I create opt-in forms, I need to choose which list to put them on. Plus, I can use list entry as an automation trigger.
So, for now, I created 3 lists. They are:
- Free Members
- PRO Members
- THE EDGE
Putting THE EDGE as a separate list will allow me to provide flexibility for people to opt out of THE EDGE and still remain on the list.
If I need to add more lists for additional flexibility later, I will.
Setting Up Automations
Just like with tags, my Drip account had a long list of workflows & rules. And many of them were outdated and were no longer used, but still they sat there and took up space.
So, one of the first things I did was go through my list of workflows and rules in Drip and start de-activating all the ones I knew weren’t being used anymore. All this did was allow me to more easily focus in on the ones I needed to re-build in some way in FluentCRM.
Once that was done, it comes down to noting the differences in how these tools do automations.
Certainly, Drip has far more capability than FluentCRM. A lot more automation options. Drip is a more mature tool as it has been around far longer. At the same time, however, the fact that FluentCRM sits within Wordpress itself means I have different options available to me due to the direct integrations.
In some cases, though, the young age of FluentCRM shows in terms of lack of flexibility or even outright bugs.
In one case, I set up one single automation in FluentCRM that would trigger on a WooCommerce order of 3 different products. Then, I would use conditional branches to react based on which of the 3 products were purchased. It looks like this:

This automation did not work as designed, however.
It seemed to have an issue using WooCommerce order data within conditionals. So, it would fly by all 3 conditionals and none of them would trigger. So, I ended up having to break this up into 3 different automations with each triggered by a tag. Here’s one of them:

So, I use WP Fusion to add a tag depending on the product purchased and then FluentCRM does exactly what it is supposed to do.
One thing I really like, though, is that FluentCRM allows you to name each step of the automation as you choose. This means I can use plain-English descriptions of what’s going on, making it much simpler to remind myself what’s happening later. With Drip, I had to document that stuff externally in a document or wade through the workflow to refresh my memory.
One thing I would love to see is the ability to give a description to each automation. But, even Drip doesn’t have that.
So, to check up on where I am in this process so far….
I have not yet imported any leads. So far, I’m just working on the plumbing. Adding some email templates, tags, and some automations I know I will need. I am leaving all the automations in DRAFT mode just to be sure that when I begin importing people none of them will execute.
I know that some of these things will need to be fixed or created “on the fly” after the fact. I don’t need to get every little thing in place right away, but I am building the basics up so that when I “flip the switch” and FluentCRM becomes the lead system, business goes on.
Keeping Two CRMs In Sync While I Move Things Over
So, at this point, I had a lot of the plumbing sitting there and ready to go. I figure I can always perfect things after FluentCRM is my “live” CRM. In fact, it would be easier to do.
The next step is to get subscriber profiles copied over to FluentCRM. But first…
I think it would be good to set up a basic process of keeping NEW incoming leads in sync between both FluentCRM and Drip. Here’s why…
- It takes time to export multiple CSVs of my list, sort through things, do the imports. While I’m attending to those logistics, new leads would be entering Drip and those leads would not be in FluentCRM. This could lead to repeat work or leads getting “lost” on Drip because they were never imported.
- Even once all the leads are in FluentCRM, there’s going to be a little time gap while I need to reset WP Fusion and set up all the protections all over again using the new CRM and new tag structure.
So, basically, I need to draw a line in time. A point in time at which I KNOW I don’t need to worry about new leads showing up in Drip and not being in FluentCRM.
The easiest way to do this is to set up my opt-in forms so that they will add new leads into both FluentCRM and Drip simultaneously.
This isn’t difficult to do with my set of tools:
- ConvertBox can perform multiple operations on form submission, so putting leads into Drip and using webhooks to put leads into FluentCRM isn’t difficult.
- Fluent Forms obviously works with FluentCRM beautifully, but forms can run multiple connections at the same time. So, I can easily send leads into 2 systems.
- In a few locations, I am using Elementor forms. And Elementor can do the same thing.

So, at this point, I went through all of my incoming lead sources on the site. I made some changes. And I made it so that all opt-in forms would send people into both Drip and FluentCRM at the same time.
If any automations change their tags in Drip, that would not be reflected in FluentCRM. I could work some hook magic and fix that gap, too. But, I figure it isn’t worth the time. As long as I tag new customers, it’s OK. And, in the time this will take, that number won’t be large enough that I couldn’t do it manually.
Once this was done, I had a setup where all new incoming leads were being sent to both FluentCRM and Drip at the same time. This is important for me because WP Fusion is the core of the membership and it is hooked to Drip (for now). It can only be hooked to one CRM at a time, so I need to keep Drip active while keeping FluentCRM updated in the background.
Then, I can move to the next step…
Importing The List From Drip
OK, this is the part where things get more tedious.
There’s really no way around having to use CSV files to move your list. You will export out of one system and import into the new one.
The thing is…
There’s no universal format here. So, you’ll usually end up exporting a bunch of stuff you don’t even need out of the old CRM… then have to edit the column names and do some field matches to get them into the new one.
When moving a marketing automation CRM, it gets even more complicated…
There are tags. Automations. Usually a lot of custom fields. And those things don’t always translate over beautifully.
Plus, as it turns out, FluentCRM does not have the ability to import tags in a CSV file and auto-assign them. Instead, you import the data, but you have to select the list and tags as a selection at the time of import. This means… I’m going to have to use a bunch of different CSVs. Essentially, one for each tag I want to move over.
This is definitely the “not so fun” part of switching CRMs.
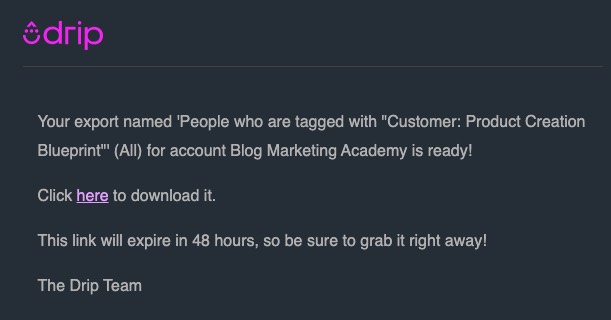
- Filter my list in Drip to show only the people who have the particular tag I am working on right now.
- Export that list to CSV. Drip will generate it and email you a link to download it.
- The file from Drip is a ZIP file, so need to unzip it to get a CSV file.
- Open the CSV in Excel and clean it up by removing the columns not needed and/or any duplicate columns. If there’s any duplicate columns names, FluentCRM won’t accept the file.
- Sort the CSV to separate active subscribers from unsubscribed so that I can respect their status on import.
- Upload the CSV to FluentCRM, map the fields, set the options, and run the import.

It is definitely tedious.
And it might be made worse by the fact that Drip has no control at all over exported files. It just dumps everything that matches whatever criteria you filter by. Plus, the way Drip handles custom fields is so uncontrolled that you end up exporting a few hundred custom fields for every subscriber. Each field ends up as a column in my CSV and I have to manually remove it all.
Not. Fun.
And I have to repeat this entire process for every… single… tag.
When you import a CSV into FluentCRM, you will match the fields. But, the bottom portion of the import window is pretty important. It looks like this:

Each CSV you import, you choose which list(s) and tag(s) you want to assign to those leads. You can also control the subscriber status (active, unsubscribed, etc.) Lastly, you can choose whether to update existing subscribers or. not.
In most cases, I would choose to update existing subscribers. This way you can add multiple tags to a person’s profile.
Also, I would use different CSVs for active and unsubscribed leads. You may choose to not even important unsubscribed leads from your previous CRM and that’s up to you. In my case, if they’re customers I still want them in the database.
After you do it a few times, you develop a pattern and it starts to move a lot quicker. But, still…
This is a very manual process. There’s no way to get around that.
Drip also has inactive leads. These are leads which are in your database, but are no longer operational. They don’t count against your billing, either. Depending on the automations you had in place that led to people being inactive, you may choose to import them or not into FluentCRM. In my case, I decided to export them all to a CSV for backup purposes, but I am not importing them into FluentCRM.
A couple little tips:
- Make sure all your automations are in DRAFT mode so that nobody is getting any emails as you import them.
- If you need to be able to tell the difference between certain sets of leads after import (in order to do some followup action, perhaps), then you can create a temporary tag and add it to all those leads on import. Then, you can use that tag to segment them and do what you need to do. Just delete that temporary tag when you’re done.
It is a little difficult to give you a perfect step-by-step on this stage of switching to FluentCRM. It will be different for everybody. But, the short version is this…
It will take a lot of CSV files. It will take modifying those CSV files to strip out the crap FluentCRM doesn’t need. And a lot of imports. There’s no gorgeous one-click option for something like this, unfortunately.
If you are moving to FluentCRM from a much simpler platform (perhaps Aweber), then this process won’t be quite so annoying.
Setting Up Member Accounts With FluentCRM
As you know, this is a membership site. And I use WP Fusion to link up the site with Drip.
The way things worked, Drip would ping a special URL from WP Fusion and it would then create the user profile. It is all built into WP Fusion.
But, with FluentCRM being all “in house”, I no longer need to use webhooks to tell WP Fusion what to do. In fact, WP Fusion will no longer be creating member profiles in Wordpress.
FluentCRM does it.
One of the automation step options in FluentCRM is the ability to create a Wordpress profile. Here you can see the automation that does this:

Now, the way I set this up is that new incoming leads do NOT get a free member account immediately. Otherwise, I would end up getting spammer accounts getting Wordpress profiles and that just clutters up the database.
So, essentially, I created my own confirmation process. When a person fills in an opt-in form, they are added to a list in FluentCRM. That triggers an automation that will send them an email.
That email contains a Smart Link. Smart Links are links you can set up in FluentCRM that, when clicked, automatically do certain things. Here you can see the settings I used for the Smart Link they click to confirm they want their member profile:

When they click on that link in the email, it will add the Member tag and remove the non-member stuff. And then I use an automation that triggers when the Member tag is added which, in turn, creates their profile (see above).
Fixing Links Between FluentCRM Profiles And Wordpress Profiles
One convenient feature of FluentCRM is how it links FluentCRM profiles with the user’s Wordpress profile. You can click back and forth between the two.
From a Wordpress profile, there’s a big purple button to click to view the FluentCRM profile. And from a FluentCRM profile, you can see the user ID link.

The thing is, if that user ID is not stored in the FluentCRM database tables, it can’t do that. And when you just imported a bunch of CSV leads, it doesn’t define this ID.
I had a bunch of people who already had member profiles and who now had FluentCRM profiles, but the link between them wasn’t there.
To define that, it uses the “user_id” field in the “wp_fc_subscribers” table of your database. If that field has the user ID in it, it will show up. If the value is NULL, it will not.
Now, one way to fix this for any lead is to simply save their profile. Without even changing anything, just hit the button to update their profile and FluentCRM will detect the Wordpress profile and store the user ID.
I’ve been told that another way to do this is to run an import function using the Wordpress users as the data source.

Apparently, you can run this operation, update profiles and it will form the link. I didn’t go this route because I was concerned it might add other things to their profile I didn’t want.
So, I decided to put on my nerd hat and code up a script that would do it. Here’s the code:
<?php
if ( ! defined('ABSPATH') ) {
    /** Set up WordPress environment */
    require_once( dirname( __FILE__ ) . '/wp-load.php' );
}
global $wpdb;

$results = $wpdb->get_results( "SELECT id,email FROM wp_fc_subscribers WHERE user_id IS NULL", OBJECT );

foreach ($results as $row) {
	$checkuser = $wpdb->get_results( "SELECT ID FROM wp_users WHERE user_email = '".$row->email."'", OBJECT );
	if (count($checkuser)) {
		foreach ( $checkuser as $user ) {
			$wpdb->query( "UPDATE wp_fc_subscribers SET user_id=".$user->ID." WHERE id=".$row->id." LIMIT 1", OBJECT );
		}
	}
}
?>
If you put that into a PHP file and drop it into your Wordpress root folder and run it, it will fix the links by updating the user_id field if they have a Wordpress profile.
Use at your own risk! Backup first! And if something goes wrong, don’t blame me. 🙂
Resetting WP Fusion And Switching To FluentCRM
Since WP Fusion forms the basis of the membership site and it can only work with one CRM at a time, I needed to do a process of resetting WP Fusion so that it will switch CRMs.
It isn’t very hard.
First thing I did was to remove any “Link With Tag” options used to bulk-enroll people. For instance, I use a tag to add people to a Learndash group and, in turn, bulk enroll them in every course at once when they become a PRO member. I don’t want the reset process to screw with all that, so I temporarily REMOVED that “Link With Tag” option.
Next, I reset WP Fusion. That flushes out all the data and removes the connection to Drip.
I then connected WP Fusion to FluentCRM. This is a one-click operation since everything is in one place. It will import all the fields and tags automatically into WP Fusion.
I then re-matched the new CRM fields with the corresponding user profile fields so WP Fusion can keep things in sync.
I then went and re-instituted the “Link With Tag” option I had previously removed.
Lastly (and this is the longer part) I went through all of the product settings and content protection settings in order to re-select the proper tags now coming from FluentCRM.
For instance, I used the Bulk Edit process to re-protect all of my LearnDash courses with the proper tags. I went and verified protections on ALL content across the site to make sure it is all now using the correct FluentCRM tags for content restrictions.
I also checked all of my WooCommerce products to make sure we’re adding the correct tags upon purchase.
After resetting WP Fusion, you will find previous tags for restrictions still in place, however it is still important to re-save this data and verify so that it is properly linked to FluentCRM.
Lastly, just go through all the WP Fusion settings screens and check that it is all set up the way you want. When you reset WP Fusion, it resets everything back to default again. So, you may need to change some other settings.
Finalizing The Switch & Summary
After doing everything above, the switch was complete. But, like with all platform changes, there will be growing pains. And there will be further adjustments made.
The first larger email I sent from FluentCRM was an issue of THE EDGE. It took some additional time to finalize the look and feel I wanted for THE EDGE. And interestingly, that first email got a much lower open rate than usual.
Open rates are notoriously inaccurate, anyway. But, I also figured it is possible that a lot of people would need to allow images from the new setup in order to load the tracking pixel. It did’t concern me much, but it did raise an eyebrow.
Interestingly, the second time I sent THE EDGE from FluentCRM, all the metrics returned back to about what I was used to from Drip. So, perhaps there was a bit of “training” involved in sending from AmazonSES. Not sure.
There have also been a few issues. I can further document some of this plumbing in followup posts, but a few things I have found are:
- I found a bug when setting a custom field to 0. It wouldn’t update. This messes up my credit system in the instance where I deduct a person’s last credit. The FluentCRM team is aware of the issue and fixing it.
- As mentioned above, I found that the automations using WooCommerce data were not reliable.
- I’ve also had a couple issues where tag additions defined in an automation didn’t get executed and new PRO member signups didn’t get the proper permissions immediately. I’m still monitoring this one.
In the end, there’s a lot to like about this new setup on FluentCRM.
I love the fact that everything is one place. It just FEELS easier to manage.
I love the fact that I should never have to do this transition ever again because now the data is all “in house”. Everything is backed up together and the whole system is integrated into the rest of the site. This is much simpler than having the email list off in a remote system.
It also offers much better digital sovereignty for the business and that’s something I value.
There’s no doubt, though, that switching from a mature platform like Drip to a younger platform like FluentCRM is going to come with a few speed bumps. And, it does. In some cases, it is just something FluentCRM cannot do (yet). In a few cases, it is an outright bug.
I’m not one that gets overly worried about stuff like that. I went into FluentCRM knowing it is a younger product. Plus, I love having a direct pipeline to the developers so I can help make the product better.
So, that’s the writeup of my experience switching from Drip to FluentCRM.
In followup posts, I can document how I have integrated FluentCRM into some of my internal processes (like the service credit system that so many people seem to love).
If you’re picking up your own license to FluentCRM, click here and use my affiliate link. Also be sure to use the coupon code bmamember to save an additional 20%.

David Risley has been building on the web since 1998 and founded Blog Marketing Academy in 2008. After years helping bloggers and online entrepreneurs grow their businesses, he now runs Concierge — a done-for-you WordPress management service for membership sites and online businesses. He manages hosting infrastructure, handles the technical heavy lifting, and keeps client sites running at peak performance. Click to read his full origin story.